Edit photos
Poof! has its own photo editor that works in your browser, on your computer. Your original photo files are never changed: every edit is saved as a new version inside Poof!.
Open an item's Photos tab, click a photo to open the large viewer, then press Edit photo.
The photo window fills your browser window. Close it with ✕ in its top-right corner (or Esc); clicking beside the photo does not close it. In the large viewer, ← and → move to the previous and next photo, and S stars the photo.
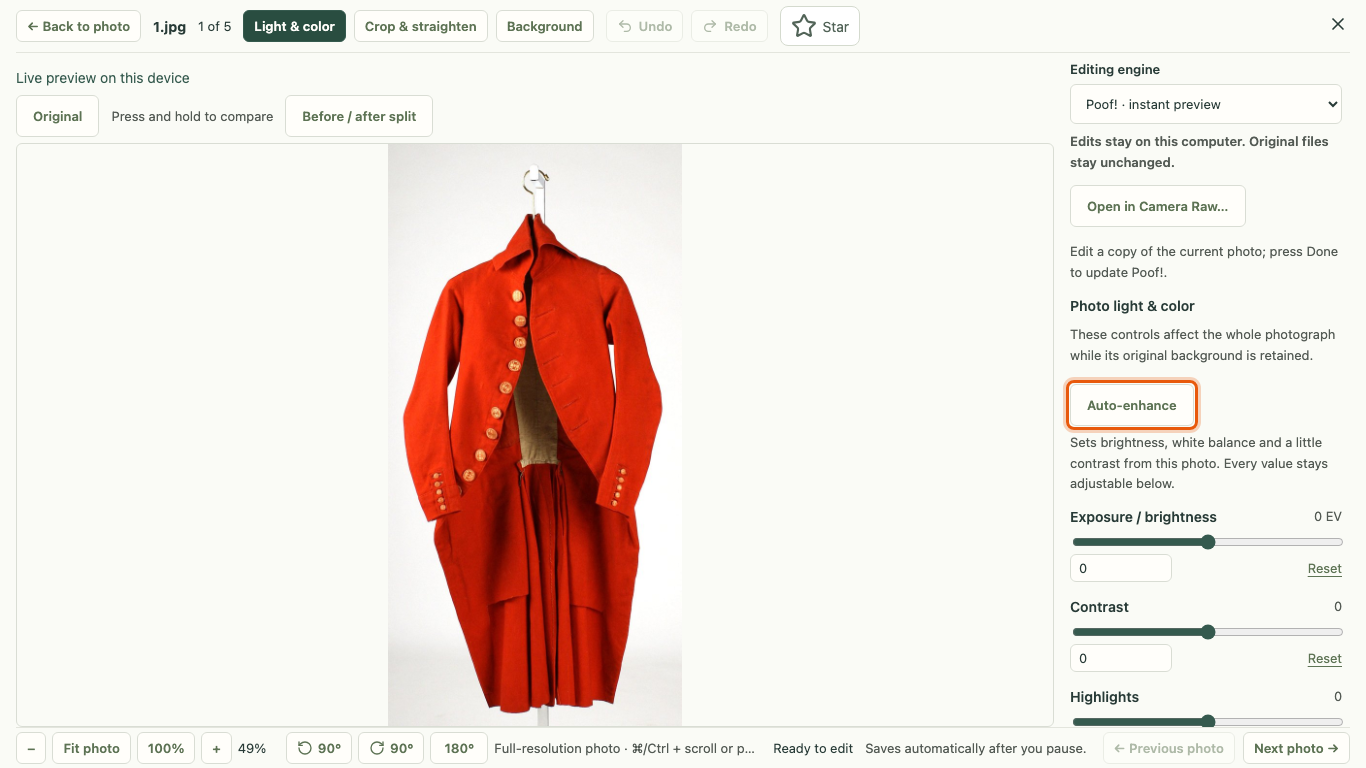
In the editor the photo takes the middle. The bar along the top has ← Back to photo, the photo's name and its place among the item's photos (such as "2 of 6"), the three sections, Undo, Redo and Star. The settings sit in a column on the right that scrolls on its own. The bar along the bottom has the zoom buttons, whether the photo is saved, with "Saves automatically after you pause.", and ← Previous photo and Next photo →. While you fix the cut-out, its tools run down the photo's left edge, and their options, with Done, stay at the top of the right column. On a narrow window the settings move below the photo.
Esc steps back one level at a time: first a shape or stroke you are drawing, then a selection you have not used, then Fix the cut-out, then the editor back to the photo (saving first), and last the photo window itself.
Zoom and move around
Scrolling over the photo moves around it when you have zoomed in; over a photo that fits, it scrolls the page or settings as usual. To zoom, hold ⌘ (on a Mac) or Ctrl (on Windows) while you scroll, or pinch on a trackpad. The zoom buttons in the bottom bar do the same, and double-clicking the photo switches between fitting it and 100%.
Keys
| Key | What it does |
|---|---|
| ⌘Z / Ctrl+Z, ⇧⌘Z / Ctrl+Shift+Z | Undo, Redo |
| + − 0 1 (after clicking the photo) | Zoom in, zoom out, fit, 100% |
| S | Star or unstar the photo |
| Esc | Step back one level (see above) |
While Fix the cut-out is open:
| Key | What it does |
|---|---|
| H | Hand: move the photo (or hold Space for a moment) |
| Z | Zoom: click to zoom in there; Option-click (Alt-click on Windows) zooms out |
| W | Object select; press again for Quick select |
| Shift+W | Magic wand |
| B | Brush |
| L | Lasso; press again for Magnetic lasso |
| X | Swap Keep and Remove |
| [ and ] | Smaller or larger brush (Brush, Quick select and Straight line) |
| ⌘ or Ctrl with = − 0 1 | Zoom in, zoom out, fit, 100% |
Pointing at a tool button shows its name and key. No key does anything while you are typing in a text box. Your browser may keep ⌘/Ctrl + 1 for switching tabs.
How saving works
- Your photo saves automatically a moment after you stop adjusting, and the editor says when it is saved. Save now saves at once.
- Undo and Redo (⌘Z and ⇧⌘Z) step through your changes.
- Press and hold Original to compare with the photo as it was when you opened the editor, or use Before / after split.
- ← Previous photo and Next photo → save this photo and move on, without closing.
The editor has three sections.
Light & color
- Auto-enhance sets brightness, white balance and a little contrast from the photo. Every value stays adjustable.
- Sliders: Exposure / brightness, Contrast, Highlights, Shadows, Whites, Blacks, Warmth, Tint and Vibrance, plus Sharpness and Noise reduction.
- Color reference helps you match the garment's color to a swatch you choose. It is a visual aid, not a color measurement.
When the background is edited separately, these sliders change only the item, and the background keeps its own look.
Crop & straighten
- Crop ratio starts at 3:4 portrait, a shape that suits most marketplaces' photo grids. Other shapes include 4:5 portrait, 1:1 square and Free crop. A ratio you saved for a photo always wins over the default.
- Drag the box to move it, drag its edges or corners to resize it, or use the arrow keys to nudge it (hold Shift for bigger steps). Then press Apply crop.
- Crop to item trims empty background around the item at the chosen shape, keeping all of the item.
- Fit whole photo keeps the full photo and adds background space instead of cropping.
- Rotate, Draw straighten line and Draw perspective guides fix tilted photos. Reset framing starts over.
- Under More crop options, Flip horizontal and Flip vertical mirror the photo, including any label text, so use them with care.
To crop or enhance many photos at once, use the Photos tab's Edit photos menu, for example Crop all listing photos to the item… or Auto-enhance all listing photos….
Background
To change the background, Poof! first separates the item from its background (the cut-out). Press Prepare background on this computer (or Prepare background in Photoshop). Your original photo stays unchanged.
Then choose a Background finish:
- Solid: a plain color, with Background brightness, Background softness and Background color.
- Soft studio light: a gentle studio-style backdrop.
- My room: your item in front of a photo of your own empty space. Add room photos in Folder & settings, under Backgrounds, with Add my room background…. Drag the item or use the arrow keys to place it, set its Size, and keep or turn off the plain Floor shadow. The room photo gets none of the item's light and color changes.
Add floor adds a simple floor plane with its own position, angle and color.
To give several photos the same background, select them on the Photos tab and press Match background of selected….
Photoshop or the free cut-out
Poof! can make the cut-out two ways:
- Photoshop, if it is installed on your Mac (Poof! uses Photoshop only on a Mac). Poof! notices it is installed and prefers it.
- On this computer, with a free cut-out tool you can add (see Add-ons).
When Photoshop is installed, the Background section shows Cut-out made with with a choice of Photoshop or On this computer. Poof! remembers your choice. A photo already cut out with the other one keeps its cut-out until you press Make the cut-out again on this computer (or …in Photoshop); your fixes carry over.
Fix the cut-out
Sometimes the cut-out leaves out part of the item, such as a mannequin's base or stand, or keeps a bit of background. Press Fix the cut-out:
- Parts left out of the cut-out show under a red tint. Removed parts sets how much they are hidden: all the way up hides them, and all the way down shows them with only a faint red tint. Poof! remembers this setting in your browser; it only changes what you see while fixing.
- Choose Keep to put parts back, or Remove to take leftover background out. Hold Shift to keep or Option (Alt on Windows) to remove for as long as you hold the key, as in Photoshop.
- Tools, each named after the Photoshop tool it works like: Object select, Quick select, Magic wand, Brush, Lasso and Magnetic lasso. Straight line and Box are in the More tools list (the ⋯ button).
- Press Hide red to see the finished photo without the tint, and press it again to bring the tint back. Holding Space shows the finished photo for a moment and lets you drag the photo.
- Undo cleanup and Reset cleanup undo your fixes. Done closes the tools; your fixes are kept.
Object select works like Photoshop's Object Selection: point at a part and it turns blue, then click to keep or remove it. You can also drag a rectangle around it, or choose Freehand and draw a loose loop around it; small gaps the selection leaves inside your loop, such as at a shine or along a handle, are filled, while larger openings like the middle of a ring stay open. Quick select works like Photoshop's Quick Selection: paint along the part and the selection grows to its edges; it is used when you let go. Paint again to add another part to it (each stroke adds), or paint with the other of Keep and Remove to take some back. Lasso changes exactly the area you draw around, without snapping to edges: drag to draw freehand, or click from point to point and click the start to finish. Magnetic lasso works like Photoshop's: click once on the edge of the part, then move along its outline without holding the button, and the line follows the edge. It stays near the path of your pointer, so a stronger edge off to the side does not pull it away. Click to pin it where it wanders; click the start or double-click to finish. When the selection tool is installed, the first time you choose the Magnetic lasso on a photo your computer also works out the item's outline with it, which takes a few seconds; meanwhile the lasso works as usual. The tool options then say Edges ready, and from your next shape the line follows the item's outline more closely. Each photo needs this only once.
Magic wand works like Photoshop's: click a color and it selects the pixels of a similar color next to it. With Remove it picks among the parts the cut-out keeps, for example a patch of leftover backdrop; with Keep it brings back removed parts of that color. Tolerance sets how close a color must be (start low and raise it if too little is picked). Contiguous, on at first, keeps the selection to pixels touching the spot you clicked; turn it off to take that color anywhere in the photo. Shift-click adds another spot to the selection. Check the striped highlight, then press Apply selection, or Cancel selection to drop it. The Magic wand needs no download.
Example: a white mannequin base on a white backdrop. Choose Keep and the Magic wand, click the base, and lower Tolerance until the highlight stops at the base's edge. Press Apply selection. If a sliver of backdrop came back with it, choose Remove and the Lasso and draw around the sliver.
Every click or stroke is used straight away. Undo cleanup or ⌘Z (Ctrl+Z on Windows) takes it back. Object select and Quick select run on your computer and need a one-time download first: press Download the selection tool when you choose one of them. Nothing is sent anywhere. They work on cut-outs made on your computer; for a Photoshop cut-out, choose On this computer in Background and make the cut-out again.
Saved keep areas
If you always shoot with the same set-up, for example a mannequin whose base the cut-out keeps removing, mark the base once and press Remember as a keep area…, give it a name and press Save keep area. Later, choose it from Saved keep areas to keep that part in other photos of the same set-up. Keep areas only change which part is kept; they never change the photo's pixels.
Clean edges
For a cut-out made on this computer, Clean edges tidies the item's outline so it uses the item's own colors, without a rim left over from the old background. It changes only the narrow edge of the cut-out, starting from your fixes, and never the rest of the photo. It is ticked when you prepare the background on this computer, and you can untick it. It works on photos edited with the newer light and color.
Shadow
With the Solid or Soft studio light finish, Shadow adds a shadow made from the item's outline: None, Contact or Soft, with Shadow strength. It darkens only the new background, never the item.
Your usual background
With the Solid or Soft studio light finish, Use this as my usual background saves this photo's finish, color and shadow for your shop, with Undo. Photos you have not edited yet start with it when you prepare their background, and Match background of selected… offers it as My usual background.
Back to the original
When a photo has an edited version, the large viewer offers Back to the original. It makes Poof! use the original photo again for this photo. Your edited version is not deleted. Straight afterwards the viewer says "Showing the original · Undo"; Undo brings back the edit that was showing. Later, a photo that shows its original while it has a saved edit offers Use my latest edit, which brings back the newest one. Both only change which version the photo shows: no photo file changes, and every edit stays in the photo's history.
Notes for the next edit
The large viewer and the editor both have a Notes for the next edit box. Use it for what the photo still needs, for yourself, a helper, or Poof!'s AI photo preparation when you start it. In the viewer press Save notes; in the editor the notes save with the photo. Nothing in the photo changes until someone edits it.
Stars
Each photo on the Photos tab has a star in its corner. Click it to star a photo you want to come back to, and click again to remove the star. In the large viewer, Starred only shows just the starred photos. A star is only a reminder for you: it does not change which photos are in the listing.
Open in Camera Raw
If Photoshop is installed on your Mac, the large viewer offers Open in Camera Raw beside Edit photo. Camera Raw opens on a copy of the photo; when you press Done in Camera Raw, Poof! adds the result as a new edited version.
For a phone photo or an edited JPEG, Poof! hands Camera Raw a temporary full-quality copy (a lossless TIFF file) rather than a JPEG, so no quality is lost on the way there and back. Poof! deletes these temporary copies when the round trip finishes, is cancelled, or fails. Your original photo is never sent or changed.
For camera RAW photos, Camera Raw works on a working copy of the RAW file, and your settings can be saved beside the original as a sidecar file, only when you choose to. See What Poof! never does to your photos.