Poof! manual
| Description | How to use Poof!, a local-first Mac app for resale sellers. |
Start here
Getting started


Now you see it. Now it's sold.
Your closet is full… with nothing to wear. Your camera roll is full… with nothing listed. …and that listing you started in March 2021? Still a draft.
Poof! is an app that helps you post items on online marketplaces, from your photos to the listing to the sale.
Available on request
The Mac installer is available on request while Poof! is in beta — it isn't a public download yet.
What it does
- Bring in photos. Choose photos from your computer or connect a photo folder. Your original files stay exactly as they are.
- Sort the pile. Group photos into items, each with its own photos, details and a short code such as
LQ-0001. AI can suggest groups if you switch it on. - Make it look good. Fix colors, straighten and crop in the built-in photo editor. With a cut-out from Photoshop or the free cut-out add-on, swap a messy background for a clean one.
- Write the listing. Write a title and description yourself, or let AI draft one from your notes and photos, which you can edit.
- Post it yourself. Your listing photos come out cropped, named and in order, cover first. Copy the title, description and price into the marketplace's Sell page, post, and paste the link back.
- Mark it sold. Record the sale, keep a To ship list and print a shipping label.
You stay in charge
Poof! runs on your computer. Your photos and listings stay there.
A local app in your browser. No account, no cloud.
Your original photos are never changed. Edits are saved as new copies.
Originals are opened read-only; every edit is a separate file with its own history.
AI is off until you switch it on, and then it is local AI or your own ChatGPT subscription.
The default setting is Local only — no OpenAI.
Every AI guess stays marked unconfirmed until you check it.
A detail is confirmed only when you check it or edit it yourself.
Nothing posts for you. You post each listing yourself.
Poof! sits beside the marketplace's form and copies fields; it never types, clicks or submits there.
More in What Poof! never does to your photos.
Where to start
- Install Poof! on your Mac.
- First-run setup: choose your photo folder and a few settings.
- FAQ: short answers to common questions.
To find anything in this manual, press the search box at the top of the page (or the / key)
and type a word, such as label or Trash.
Install
Available on request
The Mac installer is available on request while Poof! is in beta — it isn't a public download yet.
Poof! runs on a Mac with macOS 14 (Sonoma) or later, Apple chip or Intel. A Windows version is coming later; if you are comfortable with PowerShell, see Install on Windows by hand.
You don't need Terminal, Homebrew or anything else first. You need an internet connection the first time you open Poof!.
Download
Ask for a download link; approvals usually come within 48 hours. The link in your email is personal and works for 7 days.
Download Poof! for Mac from idashinder.me. You get one file,
Poof-<version>.dmg (with the version number in its name), in your Downloads folder. The same file works
on Apple-chip and Intel Macs.
Put Poof! in Applications
-
Open the downloaded
Poof-<version>.dmg. A window shows Poof! on the left, the Applications folder on the right and an arrow between them.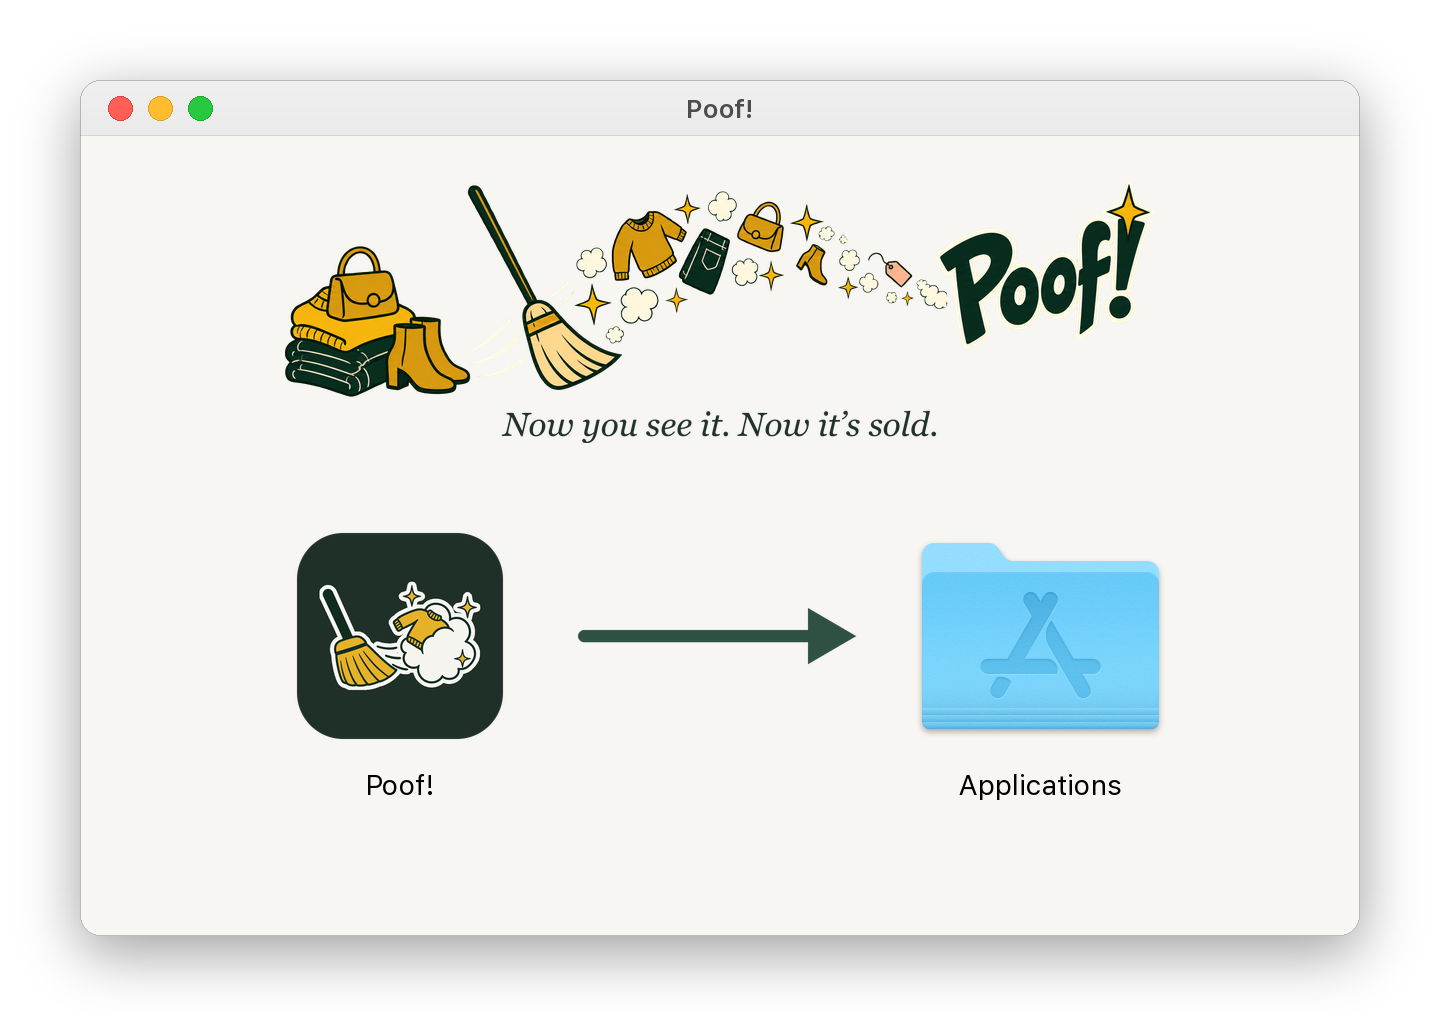
-
Drag Poof! onto Applications. Finder may ask for your Mac's administrator password; type it and press OK.
- Eject the Poof! disk: press ⏏ beside Poof! in the Finder sidebar.
- Open Poof! from your Applications folder.
Open it from Applications, not from the disk
If you open Poof! straight from the disk window, it says Move Poof! to Applications first and does nothing else. Press OK, drag Poof! onto Applications, and open it from there.
The first time: Apple's warning
Poof! is not signed with a paid Apple developer account, so macOS asks you once whether you trust it. What you see depends on your macOS version. You only do this once.
macOS 15 (Sequoia) and macOS 26 (Tahoe)
-
Open Poof! from Applications. A message says "Poof!" Not Opened: Apple could not verify "Poof!" is free of malware that may harm your Mac or compromise your privacy.
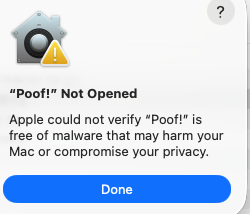
-
Press Done.
- Open System Settings (the Apple menu at the top left of your screen, then System Settings…) and choose Privacy & Security in the list on the left.
-
Scroll down to the Security section. The line "Poof!" was blocked to protect your Mac. has an Open Anyway button on its right. Press it.
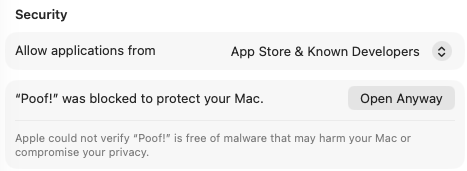
-
Type your Mac password, then press Open.
The Open Anyway button stays there for about an hour after your first try. If it is gone, open Poof! from Applications once more, press Done, and look again.
macOS 14 (Sonoma)
In your Applications folder, right-click Poof! (or hold Control and click it), choose Open, then press Open in the message that appears.
From then on, Poof! opens with a double-click like any other app.
Setting up Poof!
The first time Poof! opens, a small window says Setting up Poof!, with one line showing what it is doing. It downloads the parts Poof! needs, about 130 MB. On a fast connection this took less than a minute. Leave the window open until it finishes. Show log shows the details; Cancel stops the setup and closes Poof!, and the next open starts it again.
When it is done, your web browser opens Poof! and a ✨ icon appears in the menu bar at the top of your screen. Poof! then asks where your photos are: see First-run setup. Once Poof! is set up, it may show a one-time card offering the selection tools for fixing cut-outs; see Add-ons.
If setup stops part way, the window shows the last lines of what happened, with Try again. See Troubleshooting.
Every day
Open Poof! from Applications. It starts Poof! and shows it in your browser. Poof! has no Dock icon; while it runs, the ✨ icon sits in the menu bar. Click it for:
- Open Poof!: shows Poof! in your browser.
- Check for updates…: opens Folder & settings at Updates in your browser.
- Show log in Finder: shows the file where Poof! writes what happened, useful if something goes wrong.
- Quit Poof!: stops Poof!. Your work is saved. If Poof! is in the middle of something (a scan, moving files), it says so and asks whether to wait or quit anyway.
Opening Poof! again while it runs just shows it in your browser. Quit Poof! in Folder & settings stops it too.
Poof! is only reachable from your own Mac; other devices on your network cannot open it.
If another program uses Poof!'s connection
Poof! talks to your browser through a connection on your own Mac. If another program is already using Poof!'s usual one, Poof! picks another by itself and says so once. Everything works as usual, except the Chrome posting helper, which only works on the usual connection. Poof! moves back by itself the next time you open it after the usual connection is free again. It never stops or changes the other program.
Updates
Open Folder & settings and look at Updates, or choose Check for updates… from the ✨ menu.
- Press Check for updates. Poof! looks once whether a newer version exists; it never checks by itself.
- If one does, press Install update. Poof! downloads it, checks it and restarts on the new version. Your photos, items and settings stay as they are.
If something is wrong after an update, Go back to (followed by the earlier version) returns to the version before.
Now and then a newer Poof! app itself is needed. Then Updates says A newer Poof! app is available, with a link. Download it, and drag it onto Applications as the first time, replacing the old one. macOS then asks once more whether Poof! may open your photo folders.
Other ways to install
People who are comfortable with Terminal can install Poof! with one command instead of the download. The command and its options are in the installation notes that come with Poof!'s code (GitHub: coming soon). It sets Poof! up the same way: the same app, the same folders, the same updates. Opening the downloaded Poof! later takes over such an install; the older Poof! app goes to the Trash, and your photos, items and settings are unchanged.
Install on Windows by hand
Not ready for everyone yet
The first release of Poof! is for the Mac. A Windows version with a proper installer is coming. Until then, this page is for people who are comfortable typing commands in PowerShell and can live with the gaps listed below.
How far it has been tested
Poof!'s automated tests run on a Windows computer at GitHub with every change to the public code, and they pass there. Nobody has yet installed and used Poof! by hand on a real Windows PC. Expect rough edges, and please report what you find (see Troubleshooting).
Windows 11, 64-bit, is the target. Windows 10 may work but is not tested.
What does not work on Windows yet
- iPhone HEIC photos show no preview. Convert them to JPEG first, or set your iPhone to Most Compatible (Settings → Camera → Formats).
- Camera RAW files (CR3 and the like): framing and crop for Camera Raw need a Mac. Poof!'s own editor reads RAW files on Windows too, but RAW previews have not been tried there yet. JPEG copies work.
- Move to Trash and its Undo are not available. Poof! does not move your photos to the Recycle Bin on Windows yet. Delete files yourself in File Explorer if you need to.
- Look-alike photo hints (spotting retakes of the same item) are not available.
- Automatic label-text direction is not available. Rotate photos by hand in the editor.
- Photoshop, Camera Raw and darktable work from Poof! on a Mac only for now. Poof!'s own photo editor and the free cut-out work.
- No installer, no Start-menu icon and no Quit button. You start Poof! from PowerShell and stop it there (below). Check for updates is not available. You update by hand.
Everything else is the same Poof! as on the Mac: items, listings, the photo editor, imports, marketplace checks and the Chrome helper. Your photos stay on your computer.
What you need first
- Git. Download it from git-scm.com and install it with the default choices.
- uv, the tool that installs Poof!'s Python parts. In PowerShell, follow uv's installation guide, then close and reopen PowerShell.
- Node.js (the LTS version) from nodejs.org, which builds the part of Poof! you see in the browser.
Get the code
Poof!'s code will be published on GitHub (GitHub: coming soon). Once it is, open PowerShell, run
cd ~, and copy the code into a folder called poof with git clone, followed by the address
shown on Poof!'s GitHub page and the word poof. Then move into that folder:
cd ~\poof
Install the parts
From the poof folder, run these three commands one after another:
uv sync --project backend --frozen
npm --prefix frontend ci
npm --prefix frontend run build
They install everything inside the poof folder. Nothing is installed for the whole computer.
Start Poof!
From the same folder, run:
backend\.venv\Scripts\python.exe -m uvicorn app.main:app --app-dir backend --host 127.0.0.1 --port 8000
Then open http://127.0.0.1:8000 in your browser. Poof! can only be reached from your own computer. Other devices on your network cannot open it.
Leave the PowerShell window open while you use Poof!. To stop Poof!, click in that window and press Ctrl+C. Run one copy at a time. Keep port 8000: the Chrome helper looks for Poof! there.
Your items, settings and Poof!'s working copies are kept in the .poof folder inside poof. Your
original photos stay where they are.
Optional: the free cut-out
To remove backgrounds without Photoshop, add the cut-out to the install (about 112 MB):
uv sync --project backend --frozen --extra background
Then download its model from Folder & settings → Add-ons. From now on, keep
--extra background on the end of the uv sync command whenever you run it, or the cut-out is
removed again.
Update Poof!
Stop Poof! (Ctrl+C), then from the poof folder:
git pull
Run the three commands under Install the parts again (with --extra background if you use the
free cut-out), and start Poof! as usual. Your items, photos and settings are kept.
Terminal basics
Terminal is an app on every Mac where you type commands instead of clicking buttons. You don't need it to install or use Poof!: the download does everything. This page is for the few things that still mention a command, such as the one-command install for technical people or signing in to ChatGPT, and you never have to type a command yourself: copy it and paste it in.
Open Terminal
- Press ⌘ Space to open Spotlight.
- Type
Terminaland press Return.
You can also find it in Finder, under Applications → Utilities → Terminal.
A plain window opens with one line of text ending in %. That line is the prompt: it means
Terminal is waiting for you.
Paste a command
- In this manual, select the whole command in its grey box and press ⌘C.
- Click inside the Terminal window and press ⌘V.
- Press Return.
- Wait until a new line ending in
%appears before you paste the next command.
When a box holds several lines, paste and run them one line at a time unless the page says otherwise. Lots of text scrolling past is normal.
Go to the Poof! folder
This is only for people who run Poof! from its source code (GitHub: coming soon). Most of its
commands must run from inside that folder. If the code is in a folder called poof in your home
folder, paste:
cd ~/poof
Shortcut: type cd and a space, drag the Poof! folder from Finder onto the Terminal window, then
press Return.
Good to know
- Stop what's running: click in the window and press Control-C. This is also how you stop Poof!.
- Closing the window stops anything running in it, Poof! included.
- "command not found" means a tool isn't installed yet. The page that gave you the command says which tools it needs.
- Typing a password shows nothing on screen, not even dots. Type it anyway and press Return.
- Run the same command again: press the ↑ key to bring back the last one, then Return.
First-run setup
The first time you open Poof!, it asks where your photos are. You can connect a photo folder, or start with just the photos you choose.
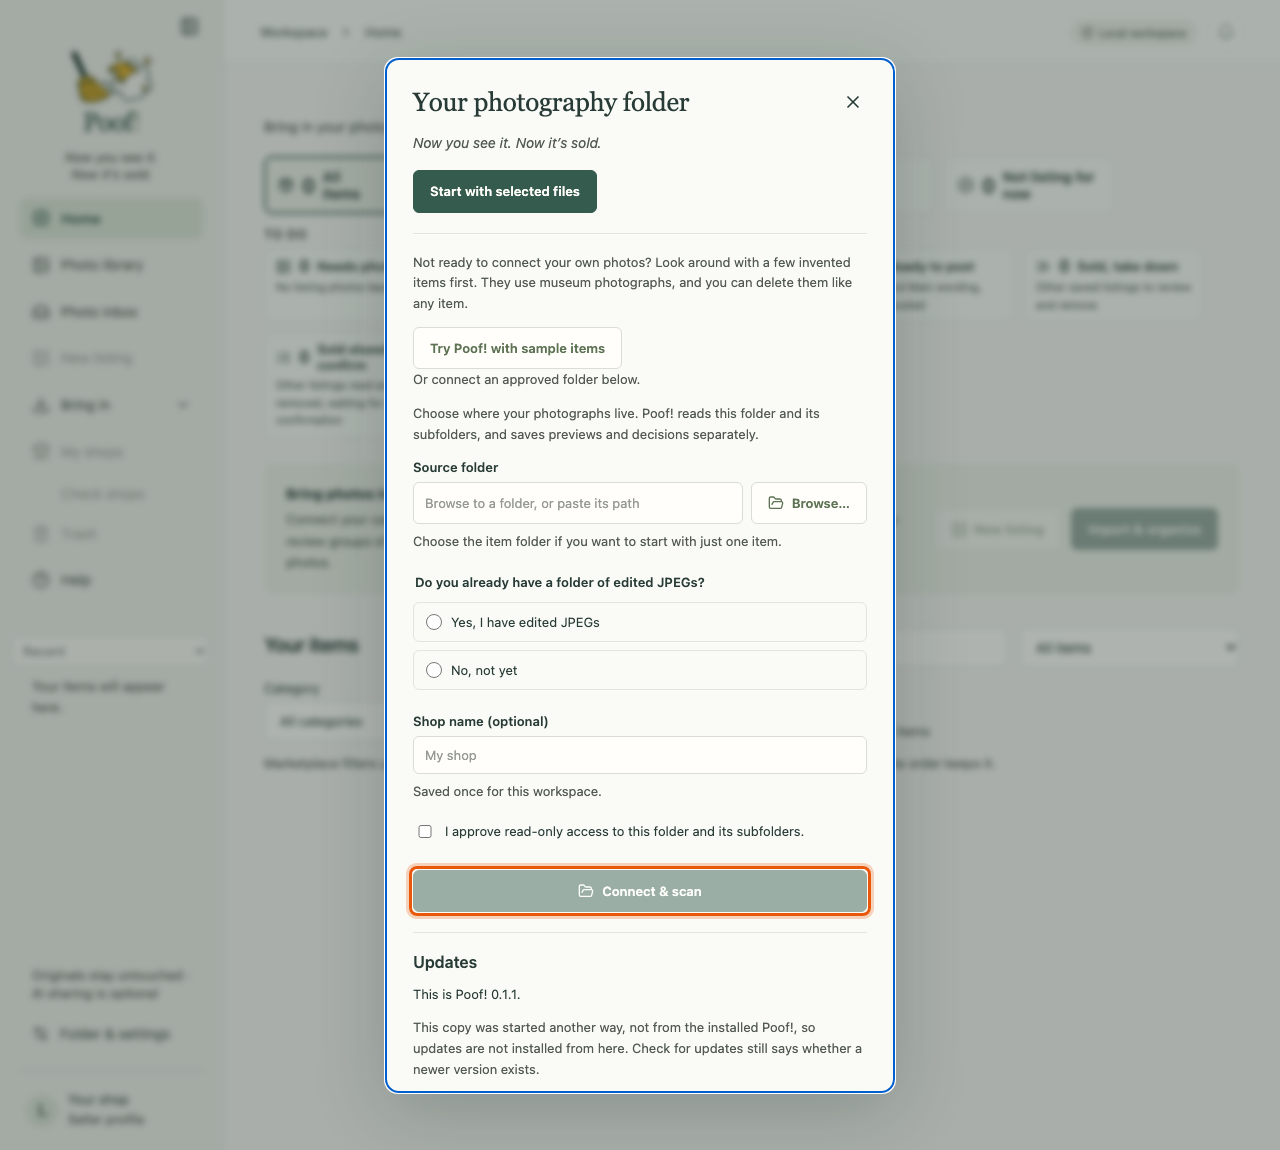
Option 1: start with selected files
Choose Start with selected files if you don't keep your photos in one folder, or you want to try Poof! on a few photos first. Poof! sets up your shop and opens Import & organize, where you choose the photos.
Poof! keeps its own copy of photos you choose this way. Your files stay where they were.
Option 2: connect a photo folder
Connect a folder if your camera or phone photos already live in one place on your computer.
- Under Source folder, press Browse… and pick the folder in the window that opens (Finder's folder window on a Mac, File Explorer's on Windows). You can also paste the folder's path. To try Poof! on one thing first, pick the folder of just that item.
- Answer Do you already have a folder of edited JPEGs?
- Yes, I have edited JPEGs: press the second Browse… and pick the folder inside your source folder that holds your edited copies. If your edited JPEGs sit in the source folder itself, press My source folder already contains the edited JPEGs. Poof! labels JPEGs in that folder as edited photos and the rest as originals.
- No, not yet: continue with your originals.
- Type a Shop name (optional). If you leave it empty, your shop is called "My shop". Poof! asks for it only this once.
- Tick I approve read-only access to this folder and its subfolders.
- Press Connect & scan.
Poof! now reads the folder and makes previews. A scan reads files and makes previews; it does not look at what is in your photos, and it never changes them. Choosing a folder does nothing until you approve it and press Connect & scan.
Read-only means read-only
Poof! keeps its previews, decisions and working copies in a separate folder of its own. The folder you connect is only read. The one exception is a sorting folder you choose to organize; see Photo inbox.
Change it later
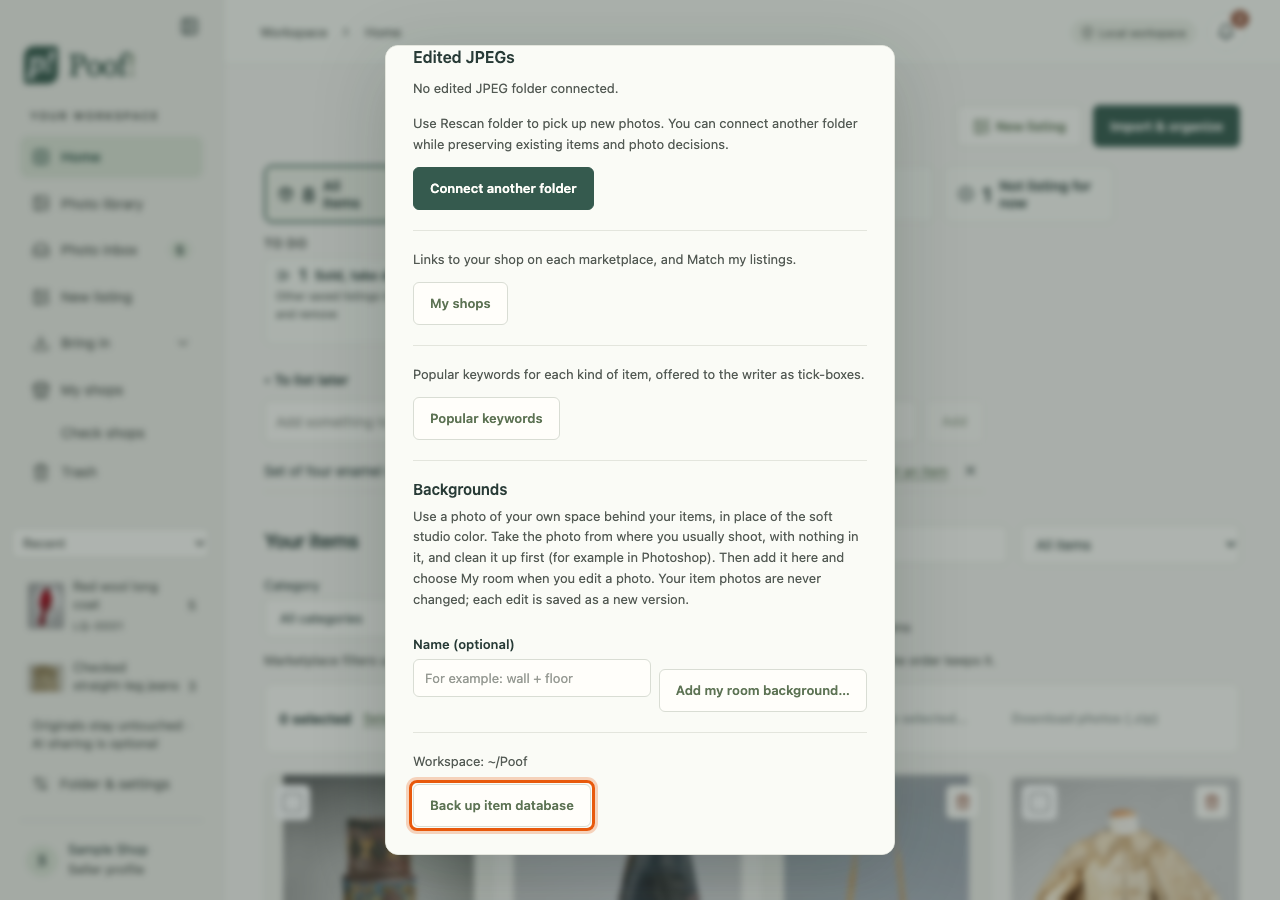
Open Folder & settings in the side pane. The same window shows your folder, and also holds My shops, Popular keywords, room backgrounds for photo editing, and Back up item database.
Photos into items
Bring in photos
Import & organize photos brings a batch of photos into Poof! and helps you sort them into items. Open it from the side pane: Bring in › Import & organize photos. Home also has an Import & organize button.
If you have photos of just one thing, New listing is quicker.
1. Choose the photos
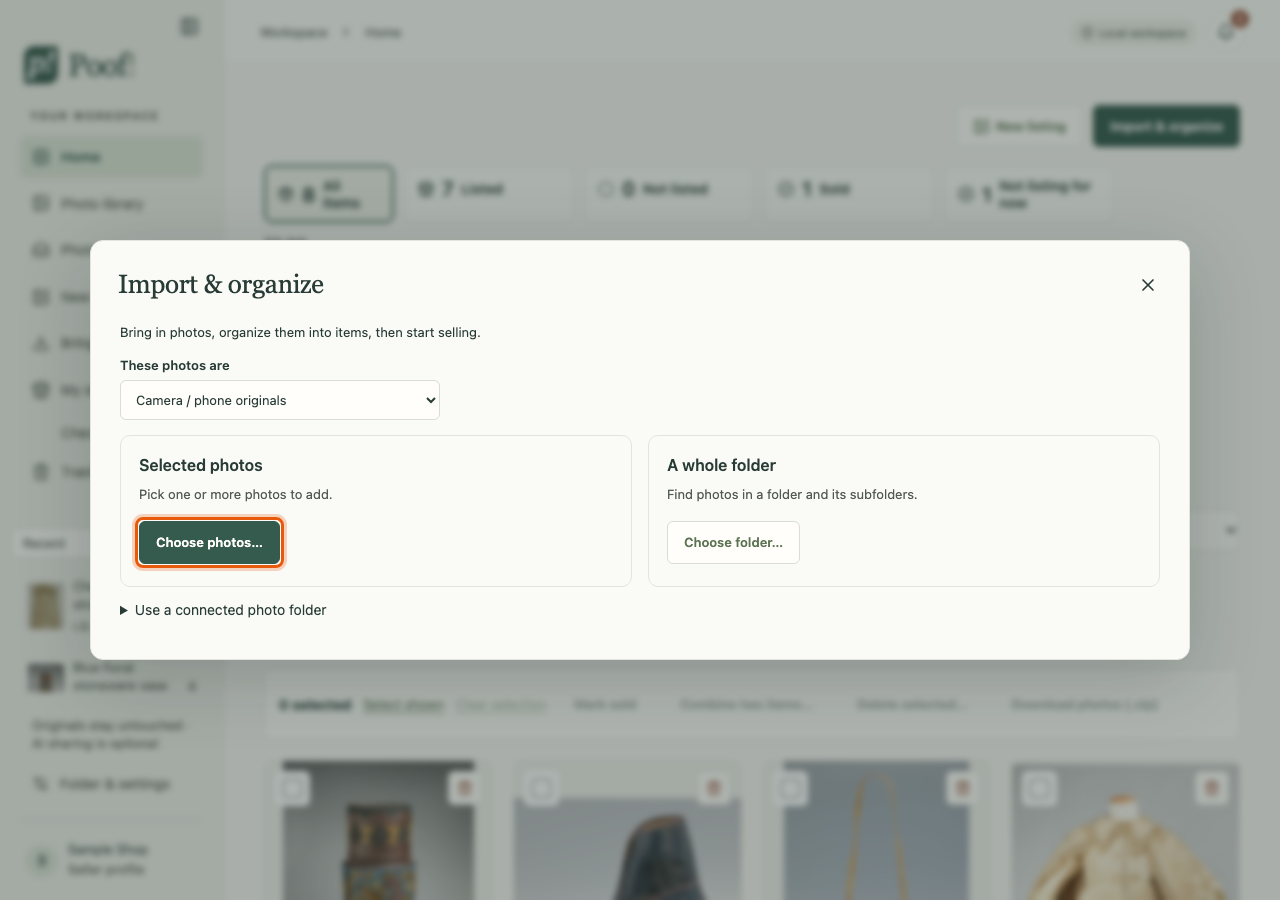
- Choose photos… picks one or more photo files.
- Choose folder… finds every photo in a folder and its subfolders.
- Use a connected photo folder works with a folder you connected in setup. Press Scan this folder to read new files first.
Tell Poof! what kind of photos they are: Camera / phone originals or Already edited real-item photos.
Poof! keeps its own copy of the photos you choose. The files on your Mac are not moved or changed.
Photos from the Mac's Photos app
Don't drag photos out of the Photos app into the browser: Photos hands over small previews instead of your full photos. Use Choose photos… and pick Photos in the window's sidebar, or export the photos from Photos first (File › Export).
Some filenames are already in Poof!
If some files have names Poof! has seen before, it stops and shows them under Some filenames are already in Poof!. Each one says where the earlier file is.
- Exact copies are always skipped.
- Cameras reuse names, so a file with the same name can still be a different photo. Tick it to import it anyway.
- Press Import N files to go on. If nothing is new, the window says so and the button reads Done.
2. Group the photos into items
Poof! shows the photos you chose, all ticked. Untick any you want to leave out of this round.
You now have two ways to make items:
- Group with AI…: ChatGPT looks at the photos and proposes which belong together. This needs ChatGPT switched on, and the window says exactly what is sent before you start. Under How many items? choose Automatic or Set a number. Then press Organize photos. Progress is saved as it goes, so you can close the window and come back.
- Organize without AI: press Selected photos are one item to make one item from the ticked photos, or Group manually to build the groups yourself. Nothing leaves your computer.
3. Review your items
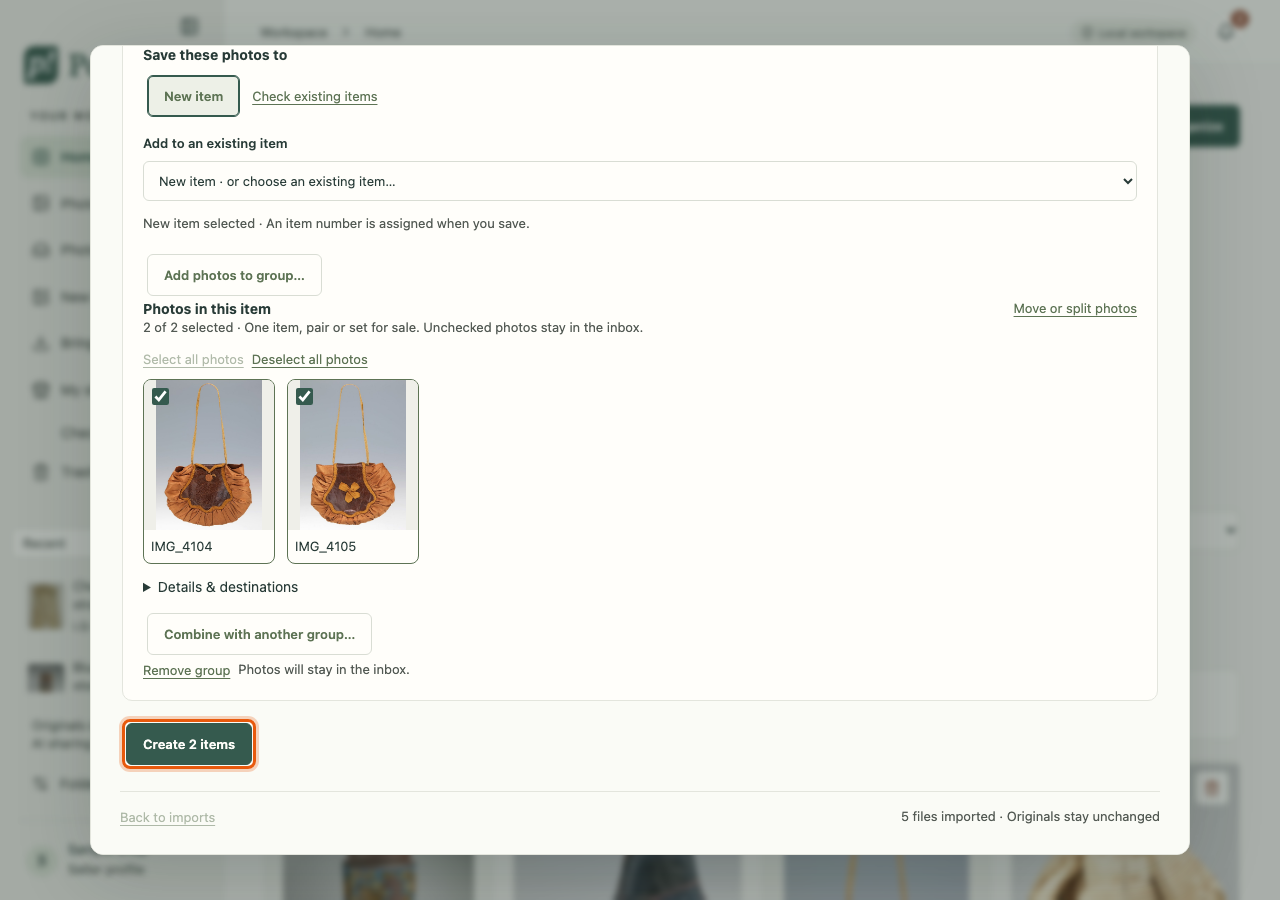
Under Review your items, each group becomes one item. For each group you can:
- type an Item title and choose a Selling category;
- untick photos that don't belong (they go back to the inbox);
- use Move or split photos to move photos between groups;
- use Combine… to join two groups that show the same thing;
- press Add item group to start another group.
Each group makes a new item unless you choose an existing item for it. To look for one, press Check existing items. It searches your saved items on this computer by wording and records, not by looking at the photos, so treat its suggestions as clues.
Are these the same item?
Before creating items, Poof! checks whether any two groups have similar titles or details. If so, it asks Are these two the same item? Look at the photos, then press Same item — combine these or Different items — create them separately. While the question is open, the create button reads Answer the question above first.
Keep uncertain photos for later
You don't have to place every photo. Photos you leave out of every group stay in the Photo inbox, ready for another time. Leaving a photo out never deletes it.
Save the review
- Save review for later keeps your groups so you can stop and come back. Find the review again with Resume review in the Photo inbox.
- Create N items (or Save reviewed items when a group goes to an existing item) makes the items. Then See new items shows them on Home.
Where the photos go
- Photos you placed in an item appear on that item's Photos tab.
- Photos you didn't place wait in the Photo inbox under New imports.
- If your photos came from a connected sorting folder named
00_SORTor00_to_sort, pressing Finish sorting moves the sorted files into their item folders, after checking each file. Photos you didn't sort stay where they were. See Organize item folders.
Photo inbox
The Photo inbox holds photos that are in Poof! but not yet part of an item. Open it from the side pane (Photo inbox, which shows how many photos are waiting) or from Bring in › Photo inbox.
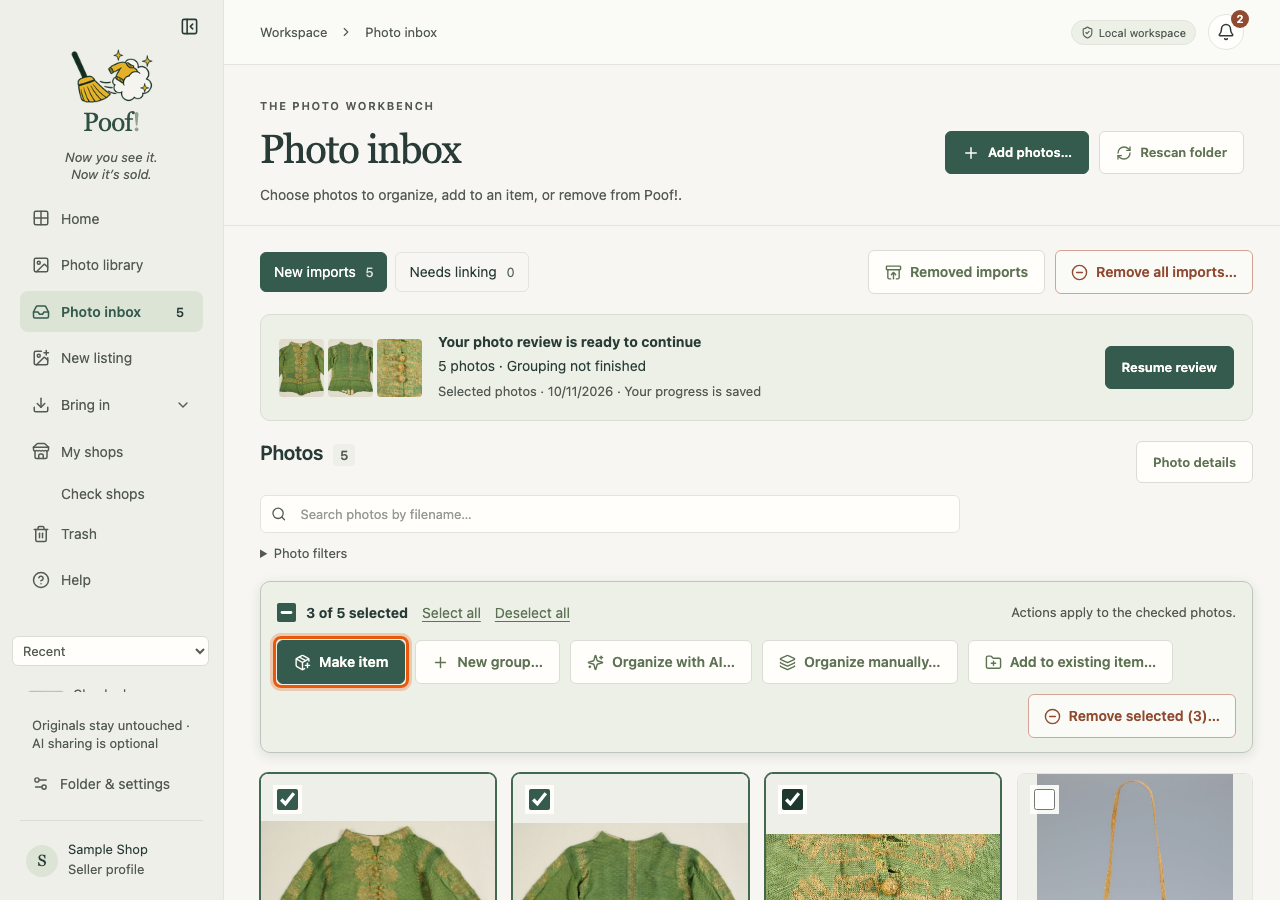
Two views
- New imports: photos you brought in that are not in an item yet.
- Needs linking: photos found inside an item's folder on your Mac that are not linked to an item in Poof! yet. Open one to link it to the right item.
Select photos
New imports start with every photo ticked. Change the selection the way you would in Finder:
- Click a photo's tick box to tick or untick it.
- Tick one photo, then Shift-click another to tick every photo between them.
- Press on an empty part of the grid and drag a box across photos to tick them. Hold ⌘ while you drag to flip their ticks instead.
- Select all and Deselect all work on every matching photo, including ones on other pages.
Act on the selected photos
The bar above the photos offers:
- Make item: makes one item called "Untitled item" from exactly the ticked photos, at once, with no AI. You stay in the inbox and a notice offers Open. If you have ticked every photo and there are many, Poof! first asks Make one item or Cancel.
- Organize with AI… and Organize manually…: open Import & organize with the ticked photos.
- New group…: start a new group in a saved review.
- Add to existing item…: put the ticked photos into an item you already have.
Making an item from the inbox doesn't move any files on your Mac.
Resume a saved review
When you saved an Import & organize review for later, it waits at the top of the Photo inbox under Saved photo reviews. Press Resume review to carry on where you left off. Nothing is sent to AI when you reopen it.
Organize item folders
This is for people who keep a sorting folder on their Mac. If you connected a folder named
00_SORT or 00_to_sort (capital or small letters both work), Poof! can move the photos you
have sorted out of it and into a folder for each item.
- Open Bring in › Organize item folders.
- Press Review folder organization. Poof! lists every file it would move and where to.
- Check the list, then press Move files into item folders.
Poof! checks every file before and after it moves, never replaces a file that is already there, and keeps a record so an interrupted move can be finished with Resume and verify moves. Photos you haven't sorted stay in the sorting folder. Poof! moves files only from a folder with one of those two names, and only when you press the button.
New listing
New listing starts one item from a few photos, without going through Import & organize. It is in the side pane, and on Home beside Import & organize.
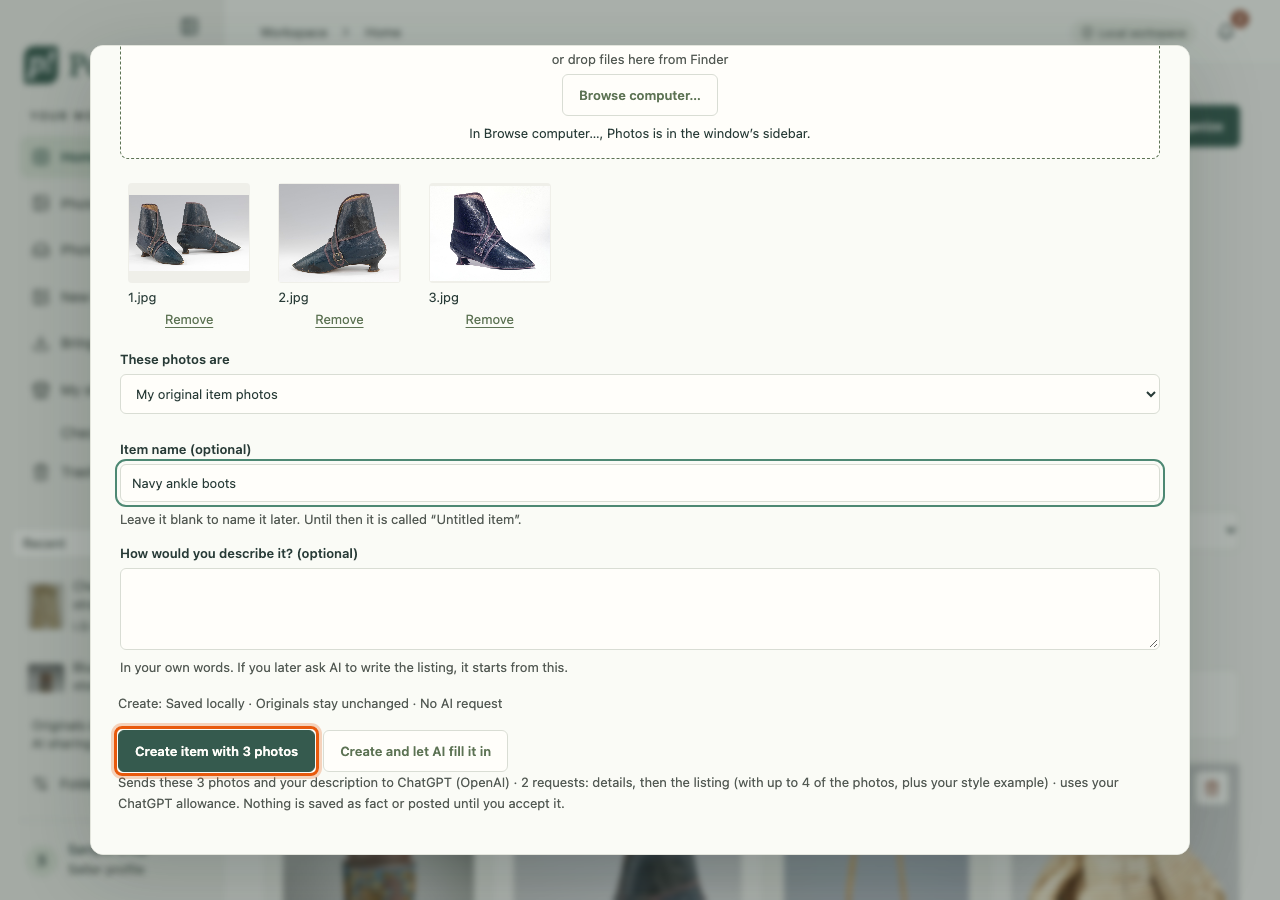
Make an item
- Add photos: drag them in from Finder, paste them (⌘V), or press Browse computer….
- Say what they are: My original item photos, My edited item photos, Screenshots or online photos or AI-generated images. Only your own photos count as photos of the item.
- Optionally give the item a name. Left empty, it is called "Untitled item" until you name it.
- Optionally fill in How would you describe it? in your own words. Poof! saves this on the item and uses it if you later ask AI to write the listing.
- Press Create item with N photos.
Poof! makes the item, adds a copy of the photos, and opens the item. Your original files are not moved or changed. Creating an item never sends anything to AI.
Small previews
If a photo is smaller than about 1,200 pixels on its long side, Poof! warns that it looks like a small preview, not your full photo. This usually happens when photos are dragged out of the Photos app. Use Browse computer… and pick Photos in the window's sidebar, or export the photos from Photos first (File › Export).
Create and let AI fill it in
With ChatGPT switched on and your own photos chosen, a second button appears: Create and let AI fill it in. A line beside it says what will be sent.
It makes the item just like Create, then sends two requests to ChatGPT, one after the other:
- Suggest item details reads up to 12 of the photos and your description.
- The listing writer drafts a title and description from up to 4 of the photos.
The item page shows "AI is suggesting details…", then "AI is writing the listing…". Nothing is accepted for you: press Review suggested details to check the details, and accept the draft under Listings when you are happy with it. Nothing is posted.
In local-only mode, or without photos of your own, this button is not shown.
The item page
Every thing you sell is an item. Open one from Home or from the side pane's item list.
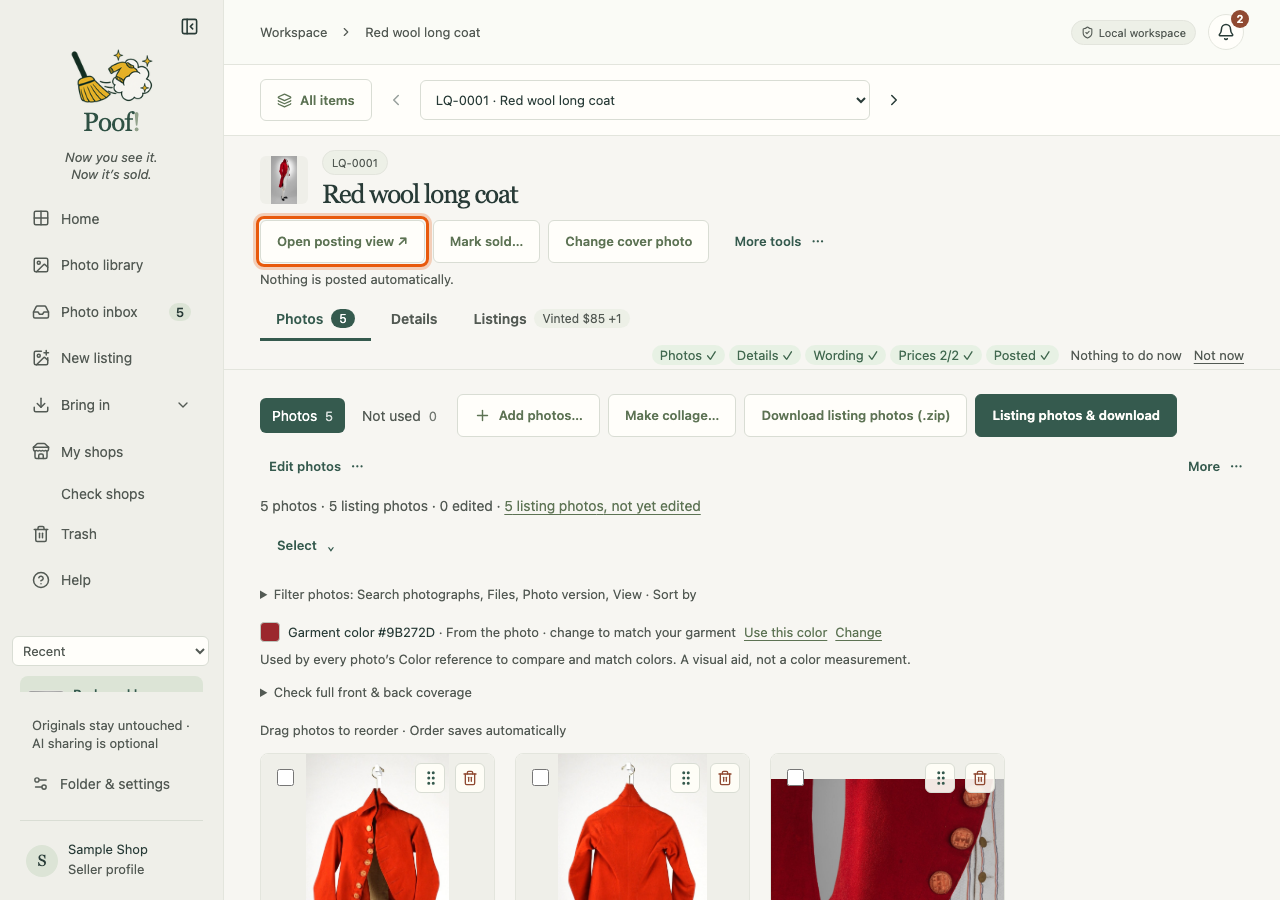
The header
At the top you see the item's cover photo, its code (for example LQ-0001) and its title. The
code never changes, even if you rename the item. Beside them:
- Open posting view ↗ opens a narrow window to place beside a marketplace's Sell page. See Post on a marketplace.
- Mark sold… records a sale. See Mark sold.
- Change cover photo picks the photo shown for this item in Poof!.
- More tools holds Not listing for now, Combine with another item… and Delete item….
The header also says: "Nothing is posted automatically."
The next-step line
Under the header, one line shows the item's progress: Photos, Details, Wording, Prices and Posted, each with a ✓ when it is done. A green button names the next thing to do, such as Add photos, Write the listing, Post it or Choose a selling category. Press it to jump to the right tab.
The Not now link beside it sets the item aside. See Not listing for now.
Three tabs
Photos
All the item's photos, in your order. The first photo is the cover unless you chose another. Drag a photo to change the order.
- Each photo has one badge: In listing or Not used. Press it to switch. Every photo of yours is in the listing unless you mark it Not used. Not used photos stay in Poof! but are left out of downloads, the listing writer and the posting view.
- The views Photos and Not used above the grid show each group.
- The tick box on a photo only selects it for an action. It is not saved. With photos selected, the bar offers Delete selected…, Move selected to another item…, Match background of selected…, Compare 2, and Put in listing or Mark Not used.
- The Select menu has Select all shown, Select none, Invert selection and Use all photos.
- Add photos… adds more photos. Make collage… makes a collage (see Collages). Download listing photos (.zip) downloads the listing photos (see Download photos).
- Edit photos holds tools for several photos at once, such as matching backgrounds and cropping.
- Click a photo to open the large viewer. From there, Edit photo opens the editor (see Edit photos).
Photos copied from one of your online listings sit in their own section, From your online listing. They are not used as proof of what the item is.
Details
The facts about the item: brand, size, measurements, condition, materials and so on, plus your own description, things to mention in a listing and private notes. Every detail is optional.
Suggest details with AI (with ChatGPT on) reads the photos you choose and suggests details. AI guesses are never saved as fact:
- A guessed detail shows "From your photos · needs a look" until you check it.
- Press Looks right to confirm it, or change the value to make it yours.
- Check these one by one walks you through every unchecked guess on the item.
Brand, size, materials and care details are only read from labels that are clearly readable. Anything unknown stays unknown.
Listings
Everything about selling:
- the Main listing title and description, and the listing writer (see Write a listing with AI);
- a row for each marketplace, with its status, price, link and Post on … (see Post on a marketplace);
- profit estimates beside each price (see Profit estimates).
Delete an item
More tools › Delete item… asks first. A deleted item can be restored from Home's deleted items view, with its photos, details and listings. Deleting an item in Poof! changes nothing on any marketplace.
Listings
Write a listing with AI
You can always write a listing yourself: type a title and description on the item's Listings tab and save. If you switch ChatGPT on, the listing writer can draft or change the wording for you. You decide what is kept.
Switch ChatGPT on or off
The writer's AI settings has an AI processing choice:
- Local only — no OpenAI (the starting setting): nothing is sent anywhere. You can still write and save by hand.
- ChatGPT — sends task inputs to OpenAI: AI buttons work. Nothing is sent until you press one.
Poof! remembers the choice for your shop. ChatGPT needs a ChatGPT sign-in through the Codex app; see Add-ons. Requests use your ChatGPT plan's allowance.
Draft a listing
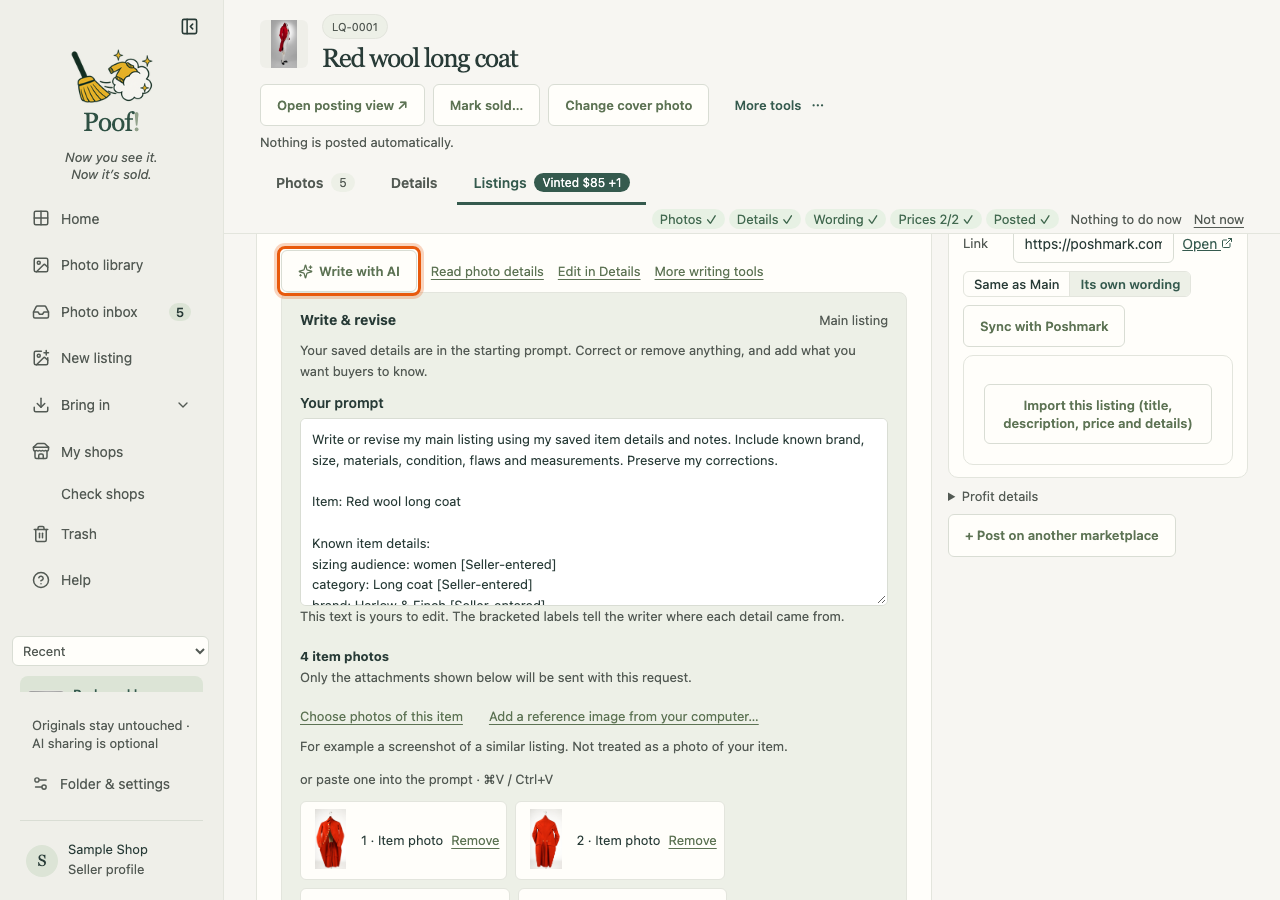
- Open the item's Listings tab and find Write with AI.
- Read the starting prompt. It already holds your saved details, your own description and the things you asked to mention, each labelled with where it came from. Correct anything, and add what you want buyers to know.
- Check the attached photos. For an item's first draft, Poof! attaches up to four recommended
photos, your listing photos first. Remove any you don't want sent; a photo you remove stays
removed. Later requests attach nothing unless you choose photos yourself.
- Choose photos of this item attaches more of the item's own photos. Label and measurement photos help.
- Add a reference image from your computer… attaches something else, for example a screenshot of a similar listing. It is never treated as a photo of your item.
- Optionally press Preview exact request to see exactly what will be sent. Nothing is sent by previewing.
- Press Draft listing. If the item already has a title or description, the button reads Revise listing and works from that wording.
The writer replies in a conversation. If it asks questions, each has its own answer box; fill in what you know and press Send answers. "I don't know" is a fine answer. Quick requests such as Make it shorter, More natural and Include measurements ask for common changes.
What the writer may and may not do
The writer uses your saved details. Unknown details are left out, not invented. Details guessed from photos are marked as guesses in the request, so your own words come first.
Accept a suggestion
Under the suggested title and description, press Accept this title and description. It saves exactly what you see as your Main listing, and you can still edit it afterwards. You can edit the suggestion in its own boxes before accepting.
If the reply offers other titles, Use this title swaps the suggested title. Nothing is saved until you accept.
Edit by hand
Type straight into Listing title and Listing description under Main listing, then save. Hand edits never need ChatGPT. A request you send later starts from your saved wording and changes only what you asked for.
Style examples
If you like how one of your listings reads, open its item and press Use as a style example under its Main listing. You can keep up to three. The writer copies their length, layout and voice, never their facts; prices, links and item codes are taken out before they are sent. Manage lists them, with Remove and Update from current wording. Style examples are sent only with listing-writer requests and show in Preview exact request.
Popular keywords
You can keep lists of words buyers use for a kind of item, for example a list called "Necklaces".
- Open Folder & settings › Popular keywords and press New list.
- Add words yourself. Each word records where it came from: you, a marketplace's search suggestions, eBay sold listings, Etsy search, or AI research.
- With ChatGPT on, Find popular keywords asks ChatGPT once for suggestions. They wait under Suggestions to check until you press Add to list or Skip. Poof! shows no made-up search numbers.
In the writer, choose the list for this item under Use popular keywords and tick the words to use. Ticked words are sent as wording requests, never as facts about the item. Unticking a word for one item leaves the list unchanged.
Update a posted listing with AI
On a posted listing's card, Update with AI takes a request, for example "Add the measurements from these photos", plus any photos you tick. It starts from the saved wording on that card. Accept the result to save it, then paste the new wording into the marketplace yourself.
Main listing and a marketplace's own wording
Each item has one Main listing: a title and description. Every marketplace uses the Main listing unless you give that marketplace its own wording.
One wording everywhere
When a marketplace uses the Main listing, editing the title or description anywhere saves to the Main listing: on the Listings tab, on a marketplace's card, in the posting view, or when you accept an AI update. Every marketplace that uses the Main listing then shows the new words.
Saving a link, a status or a price never changes wording.
Give one marketplace its own wording
Sometimes one marketplace needs different words, for example a shorter description.
- Find the marketplace on the item's Listings tab, or in the posting view.
- On the Listings tab, the marketplace's card has a Same as Main / Its own wording switch: choose Its own wording. In the posting view, press Use different wording for … (for example Use different wording for Vinted). That marketplace starts with a copy of the Main listing.
- Edit and save. From now on, changes to the Main listing don't reach this marketplace, and edits here don't reach the Main listing.
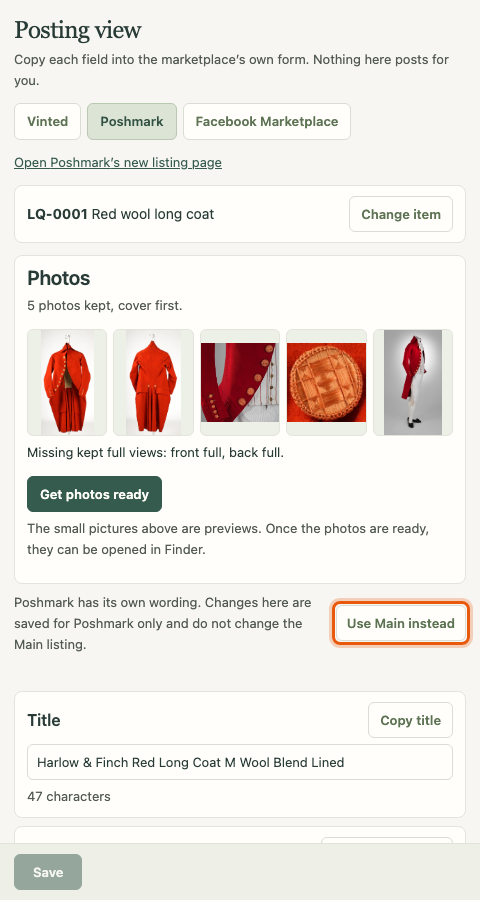
To go back, choose Same as Main on the marketplace's card, or press Use Main instead in the posting view. The marketplace shows the Main listing again. Its own wording is kept in the item's history, and Undo brings it straight back.
A draft the writer made for one marketplace stays a draft until you choose to use it.
What copies and what never copies
- Copies: the title and description, from the Main listing to every marketplace that uses it.
- Never copies: links, posting status (such as Listed or Sold) and prices. Each marketplace keeps its own.
Wording read from a marketplace
When Poof! reads one of your listings (an import, a sync or a check), the wording it read is shown beside the Main listing under Wording imported from …. It does not replace your Main listing unless you choose:
- Use this as my Main listing;
- Keep it as …'s own wording (gives that marketplace its own wording);
- Use this price.
If the Main listing is still empty, with no title and no description, the wording read from the listing fills it at once, and you can Undo that.
Post on a marketplace
Poof! never posts for you. It puts everything you need beside the marketplace's own Sell page, so you can copy it in. When the listing is live, you paste its link back into Poof!.
From the item page
- Open the item's Listings tab. Each marketplace you plan to sell on has a row.
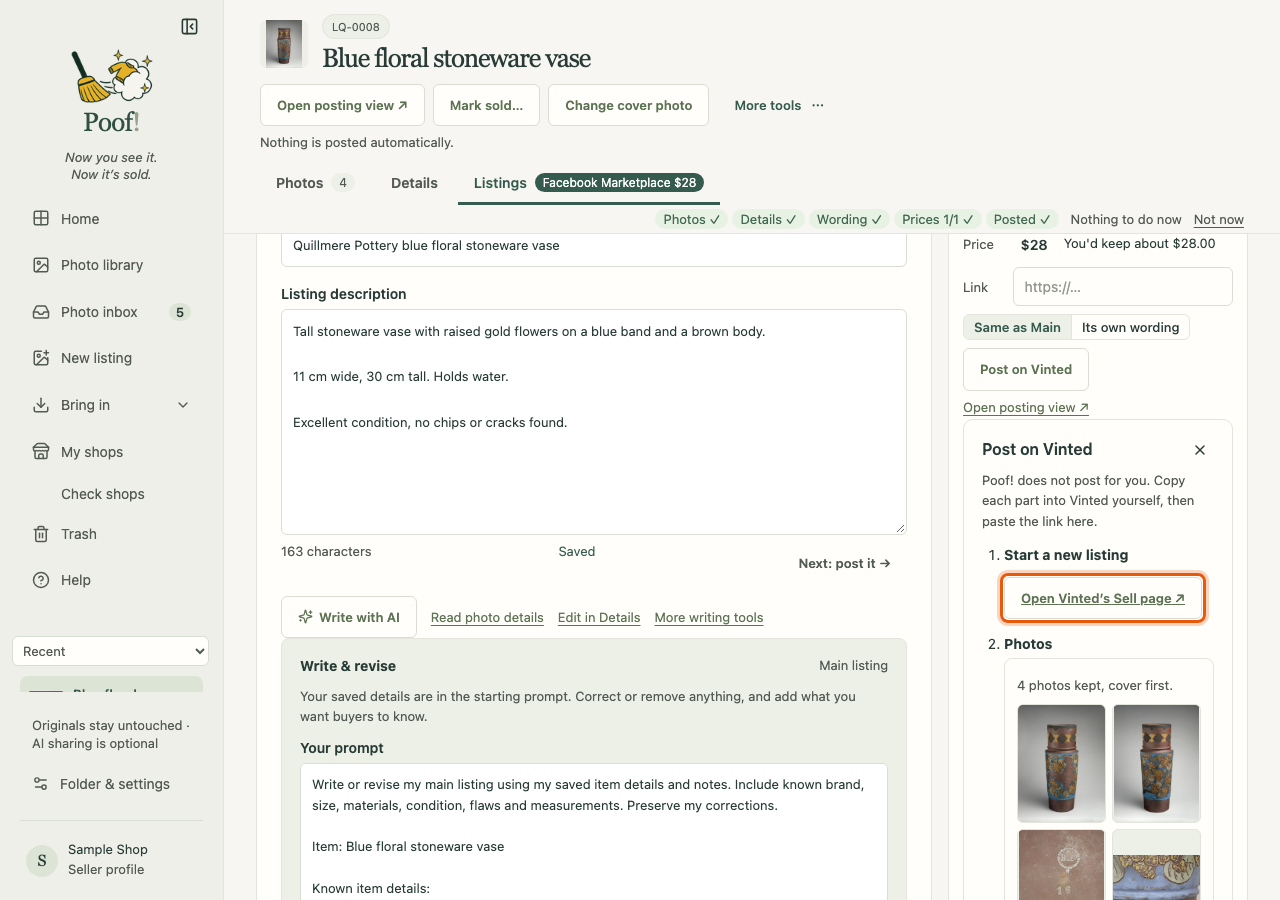
- Press Post on … in that marketplace's row, for example Post on Vinted. A panel opens
with numbered steps:
- Open …'s Sell page ↗ (for Vinted, Poshmark and Facebook Marketplace) opens the marketplace's page for a new listing in your browser.
- Photos: your listing photos, cover first. See Get photos ready.
- Title, description and price, each with a Copy button. Paste each into the marketplace's form.
- Posted it? Paste the link: see Finish posting.
- If the item has no listing photos yet, the panel offers Go to Photos. If it has no wording yet, it offers Write the listing.
To add a marketplace that has no row yet, press + Post on another marketplace.
The posting view
The posting view is the same help in a narrow window of its own, made to sit beside the marketplace's page. Open it with Open posting view ↗ at the top of the item page or in a marketplace's row.
- Pick the marketplace and the item at the top (Change item finds another item).
- Copy each field with its own Copy button: title, description, price and details such as brand, size and condition.
- You can edit the title and description in place. They save when you leave the box, when you copy, or when you press Save. The view says whether you are editing the Main listing or that marketplace's own wording, and offers Use different wording for … or Use Main instead. See Main listing.
- When you come back to the window, it reads the latest wording again. If the wording changed elsewhere while you were typing, your text stays and you choose Save my wording or Use the current wording.
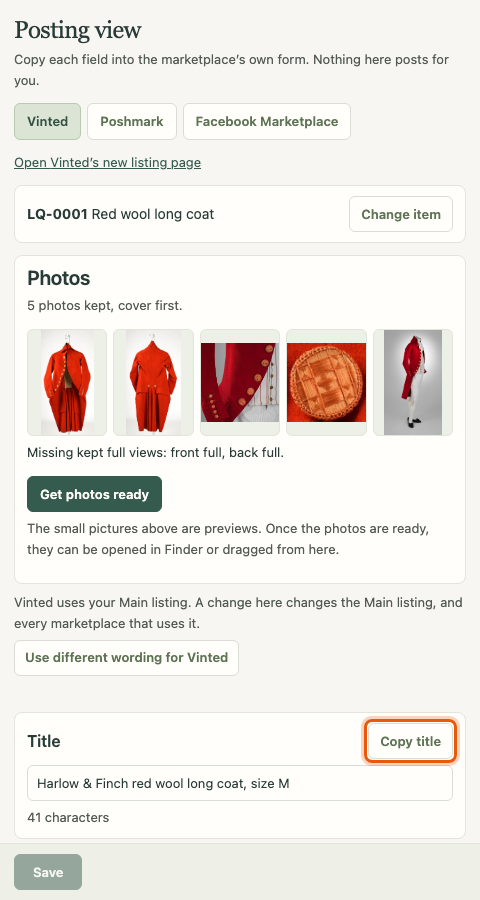
Get photos ready
In the Photos step (on the item page or in the posting view):
- Get photos ready makes upload copies of your listing photos, as edited, named with the item's code and a short title.
- Show photos in Finder opens a folder holding just those copies, so you can select them all and drag them into the marketplace's page.
- Download listing photos (.zip) downloads them as one zip instead.
If you change a photo afterwards, the view says the ready copies no longer match; press Get photos ready again. It also notes a missing full front or back view for clothing.
Finish posting
After you publish on the marketplace:
- Copy the listing's address from your browser.
- Paste it into the link box (Paste the published listing’s link).
- Check the price you listed at.
- Press Save, mark Listed. If the marketplace is already recorded as sold or removed, the button reads Save link and keeps that status.
Poof! records the link and marks that marketplace Listed in Poof!. "Listed" is what you recorded; it is not a live check that the listing is up. Then choose Post on another marketplace or Done.
Saving a link never changes the wording or the price saved for other marketplaces.
The Chrome side panel
If you use Chrome, the posting view can sit in Chrome's side panel, right beside the marketplace page. This needs a small Poof! helper loaded into Chrome once.
Set it up
- Open the posting view in an ordinary browser tab: http://127.0.0.1:8000/posting.html.
- Open its Chrome side panel section and press Put the helper folder in place, then Copy folder address.
- In Chrome, type
chrome://extensionsin the address bar and press Return. - Switch on "Developer mode" on that page.
- Press "Load unpacked". In the window that opens, press ⌘⇧G (Command-Shift-G), paste the address, press Return, then choose the folder.
- Pin the Poof! button: click the puzzle-piece button in Chrome's toolbar, then the pin beside "Poof! posting helper".
- Back in the posting view, switch on Let Chrome’s side panel show this page.
- Open a marketplace page and click the Poof! button. The posting view opens beside it.
To have the panel on the left, open Chrome's Settings, choose Appearance, find "Side panel position" and pick the left side.
What the helper does and never does
The helper only shows Poof!'s posting view in the side panel. When you click its button on a Vinted, Poshmark, Facebook Marketplace, ThredUp or Depop page, it tells Poof! which marketplace you are on, so the view switches to it.
It never types, clicks or submits anything on a marketplace page. It never reads your passwords, cookies or what is on the page, and it makes no network requests. You copy each field and move the photos yourself. The switch in the posting view turns it off at any time.
Import a marketplace listing
If you already have a listing on a marketplace, you can bring it into Poof!, either as a new item or onto an item you already have. Importing reads; it never changes anything on the marketplace.
Open Bring in › Import a marketplace listing. It works with listings on Vinted (US and UK sites), Facebook Marketplace, ThredUp and Poshmark.
1. Read the listing
- Paste the listing's full address into Marketplace listing URL.
- Press Read listing. Poof! reads that one public page, without your marketplace sign-in.
Some marketplaces, Vinted especially, often refuse to let the page be read. Poof! does not try to get around that. Instead, Paste your listing or use a saved page opens with a plain sentence saying why:
- Paste your listing here: copy the listing's text from the marketplace page, paste it with the title on the first line and the description below, then press Read pasted text.
- Or save the listing page from your browser as an HTML file (in Chrome: File › Save Page As…) and choose it. Poof! reads only the listing details in it.
- Or press Type the details in yourself for blank fields.
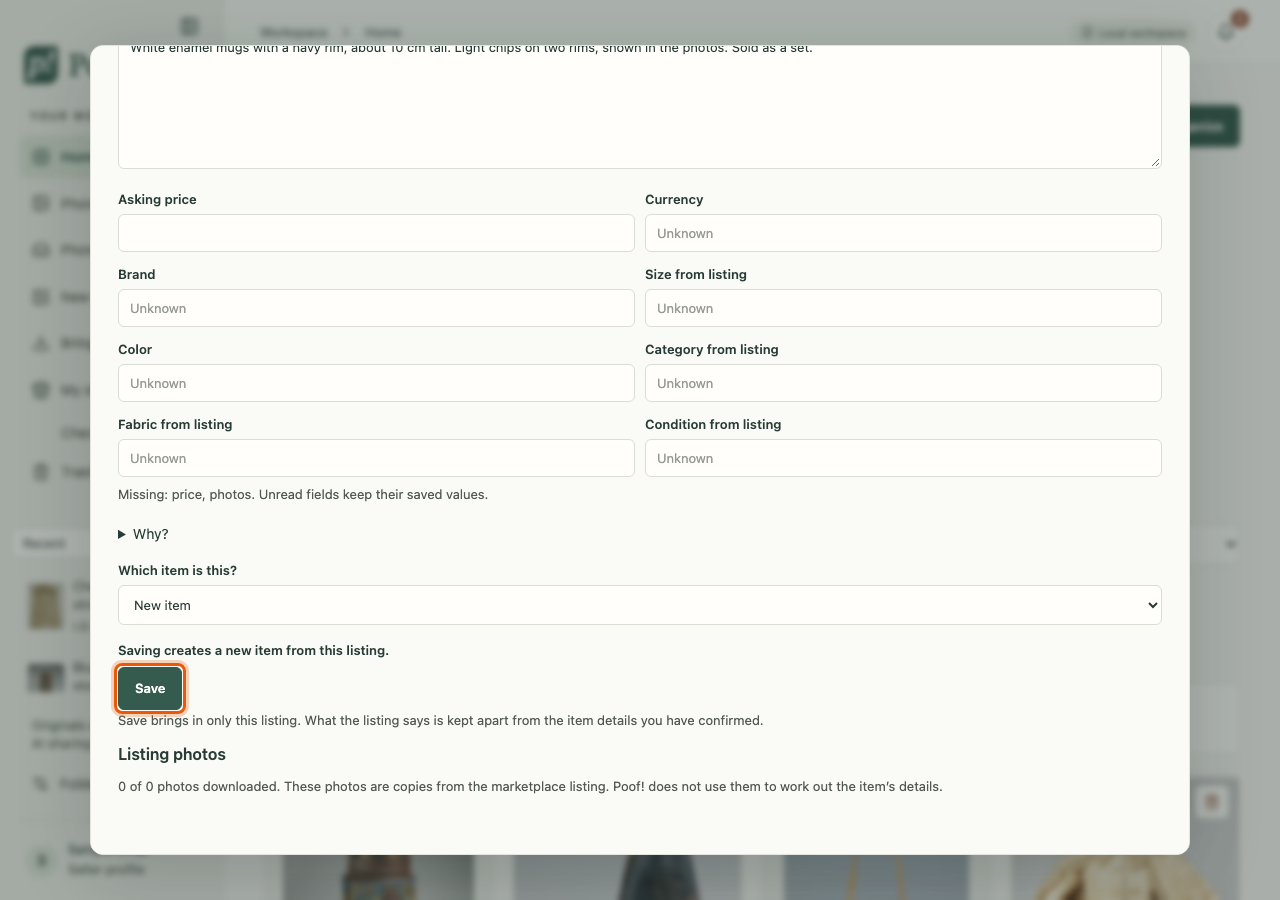
2. Check what Poof! found
What Poof! found shows the title, description, price, photos and details that were read. These are what the listing says, kept apart from the item details you have confirmed. Edit them if needed.
3. Choose the right item
Under Which item is this?, choose carefully so you don't make a duplicate:
- If Poof! already knows this listing by its exact listing number, it picks the item for you.
- A listing that only looks similar by its wording is offered as a suggestion. Check it is the same piece before choosing it.
- Choose an existing item to add the listing to it, or New item to make a new one.
Directly above Save, a line says in words what will happen, for example "Saving creates a new item from this listing."
4. Save
Press Save. Poof! then shows a notice with one Undo.
- On a new item, the listing's wording becomes the item's Main listing.
- On an existing item, the read wording is kept beside its Main listing for you to choose (see Main listing), unless that marketplace already has its own wording, which the read replaces. Only details the read actually returned replace anything, so a partial read never blanks what you saved.
- If the listing says it sold, Poof! asks you to review the sale before anything is recorded.
Where imported photos go
With the photos box ticked (Also download this listing’s N photos), Poof! downloads the listing's photos onto the item. They appear in their own section on the Photos tab, From your online listing. Poof! keeps them apart from your own photos and never uses them as proof of what the item is.
Saved imports to review
A listing you read but haven't saved onto an item waits in the import window under Saved imports to review. Each card offers Same item, Different item, add it and Set aside. Setting one aside deletes nothing; Restore import brings it back.
Listings imported without some details (for example a missing description) are listed under Listings with missing details, with Add the missing details or Check the new details.
Made a duplicate by mistake?
Delete the extra item (More tools › Delete item…). A deleted item lets go of its listing, so you can import the listing again onto the right item. To merge two items instead, open the one you want to keep and use More tools › Combine with another item….
Match my listings
Match my listings takes the listings from your shop page on a marketplace and works out which of your Poof! items each listing belongs to. It is useful when you have many listings that are not linked to items yet.
Open Bring in › Match my listings, or My shops in the side pane.
Start a match
- In your browser, open your shop page on the marketplace and scroll until every listing has loaded.
- Save the page. In Chrome: File › Save Page As… › "Webpage, Single File".
- In Match my listings, choose the Marketplace and the Saved shop page, then press Match listings.
Poof! reads only the file you chose. It does not visit the marketplace.
Listings can also arrive from your browser: when the Poof! Chrome helper's page capture is installed, it can send the listings on the shop page you are viewing. The review then says "N listings from your browser" instead of naming a file, and works the same way.
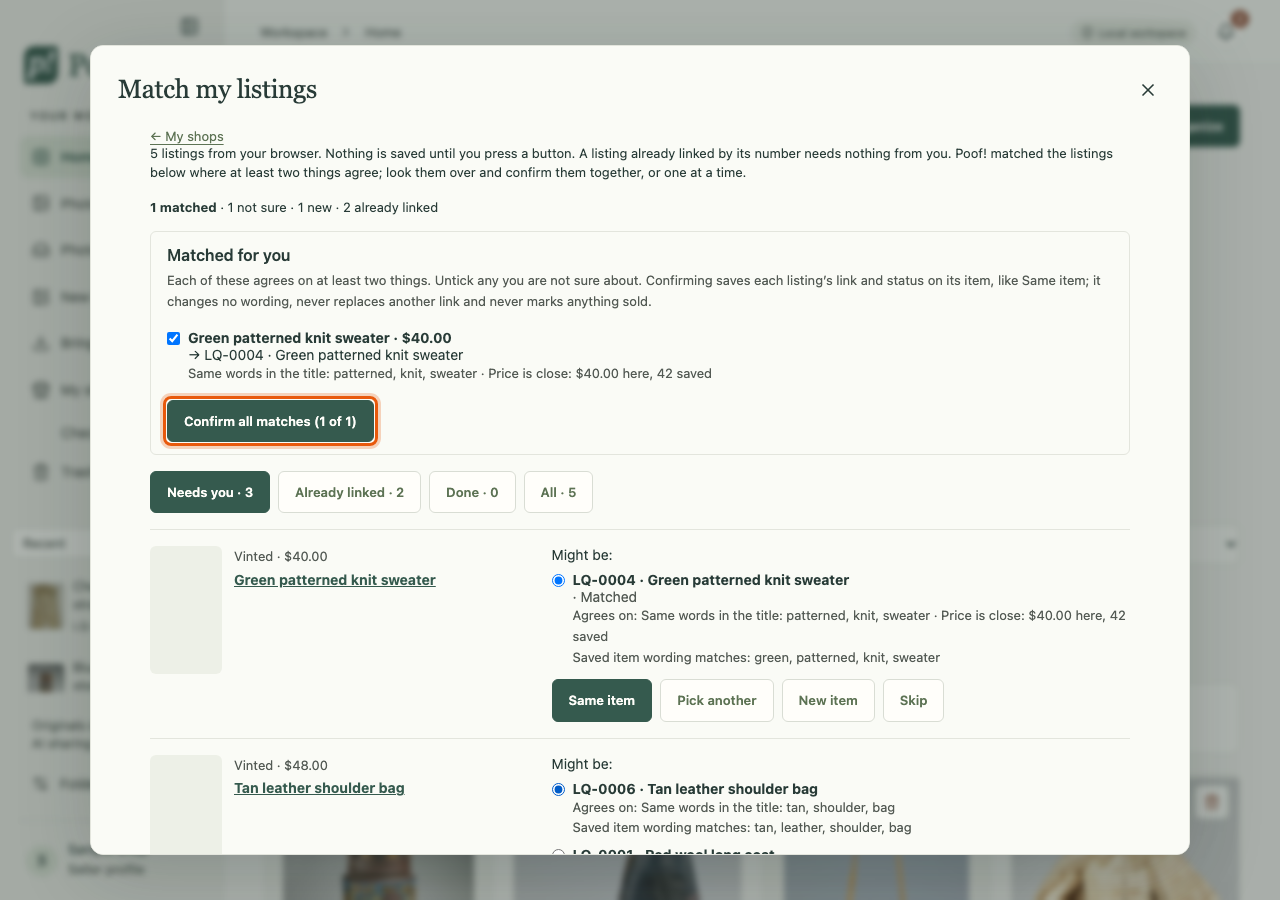
Review the matches
The review starts with one line counting what it found, for example "12 matched · 3 not sure · 2 new · 17 already linked".
- Already linked: Poof! already holds this exact listing number on an item. Nothing to do.
- Matched for you: pairs Poof! is fairly sure about, each ticked. Each shows the clues it agrees on, such as the same brand and size. Untick any that are wrong.
- Needs you: listings with no sure match. For each, choose Same item, Pick another, New item or Skip. Compare photos compares the listing's photo with your item's photos on this computer, as a hint.
Press Confirm all matches to link exactly the ticked pairs in one go. Confirming saves the listing's link and status on the item (and its price where that marketplace has its own wording). It never changes your Main listing's wording when it has any, never replaces a different saved link, and never makes a sold item available again. One line then reads "Linked N listings to your items." with Undo.
A listing that shows Sold is never confirmed with the others. Decide it on its own row, then mark the item sold on its own page.
Earlier matches, Discard and Restore
Your reads are kept under Earlier matches in My shops; press Open to go back to one.
If a read should not be there, for example a page that was not your shop, press Discard this read at the bottom of its review, then Discard. Discarding only hides the read; items and links you already confirmed stay as they are. It moves under Discarded reads, where Restore brings it back with every earlier decision.
Update from your shops and Check now
Once a listing is posted, things can change on the marketplace: you might lower the price there, or the item might sell. Poof! can read one of your listings to catch up, but only when you ask.
What Poof! reads, and when
Poof! reads Vinted and Facebook Marketplace listings, one listing at a time, only when you press a button:
- Sync with Vinted (or Sync with Facebook Marketplace) in the marketplace's row on the item's Listings tab;
- Read again in the Update from your shops list;
- Check now in the alerts bell.
There is no daily or automatic reading, and no button that reads every listing at once. ThredUp and Poshmark listings are not read this way.
Poof! uses the listing link you saved, reads the public page without your sign-in, and does not pretend to be anything other than Poof!. Each read is kept with its time and what happened.
After a listing has gone 7 days without a check, the bell reminds you, at most once a week, and lists each such listing with its own Check now.
When a read is blocked
Marketplaces sometimes refuse to let a page be read. Poof! then says so plainly, for example "Vinted didn’t let Poof! read this listing just now · try again later". A blocked, failed or partial read changes nothing in Poof!. A listing that can't be read is never taken as sold.
The review list
Home's Update from your shops card opens one list of everything your listings show that Poof! is missing or has differently. Nothing in it changes your listings on the marketplaces.
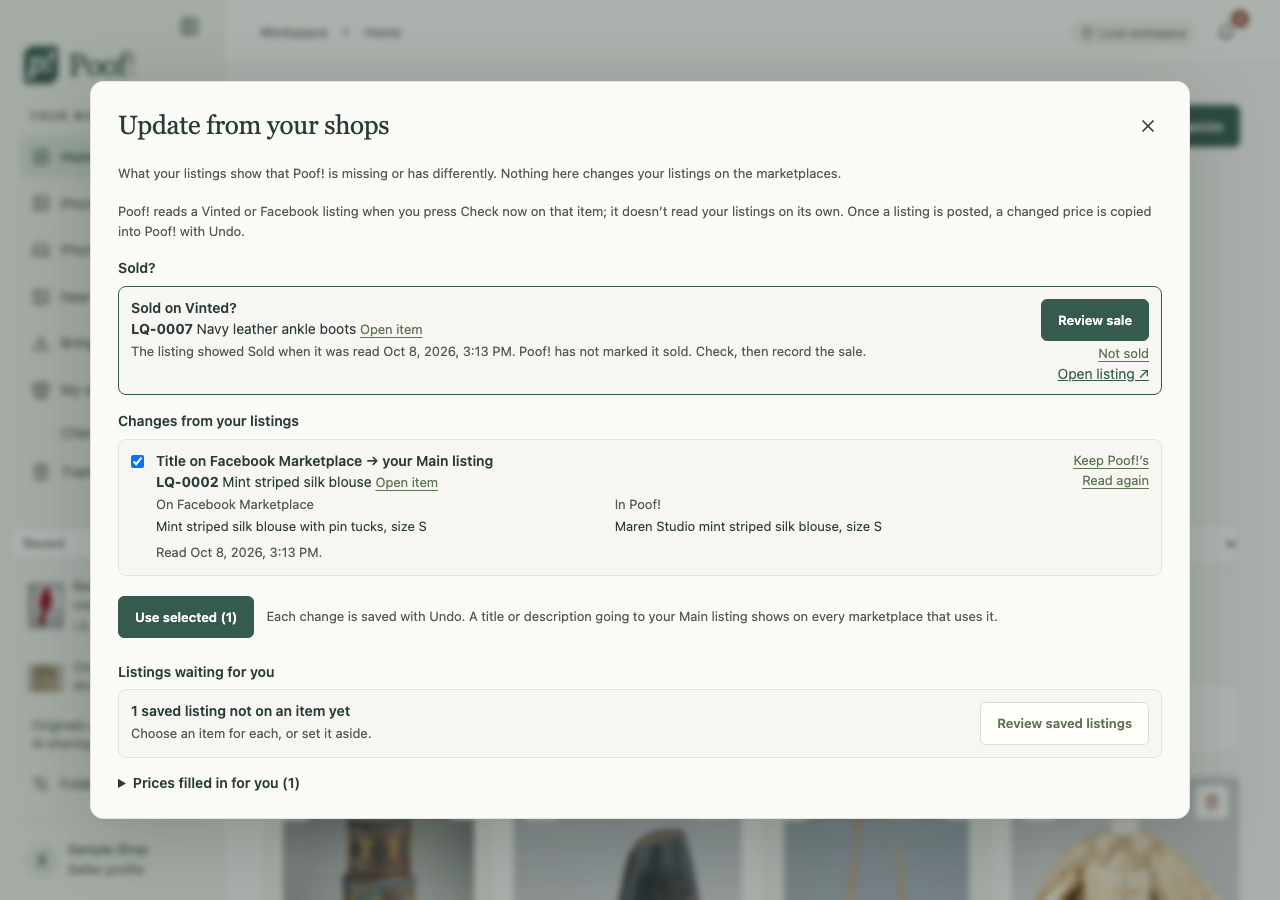
- Sold? A listing that showed Sold appears as "Sold on …?". Review sale opens the usual sale form with that marketplace chosen; Not sold dismisses it. Nothing is marked sold until you confirm the sale form.
- Changes from your listings: a title or description the listing shows differently. Rows are ticked in advance only when the read was complete. Use selected saves the ticked rows, with Undo. Keep Poof!’s keeps what Poof! has.
- Listings waiting for you: saved listings not on an item yet, and imported listings missing details.
- Could not be read, each with Read again.
- Prices filled in for you: prices Poof! filled in or copied, each with Undo.
Prices on posted listings
Once a listing is posted, its marketplace is where the price lives:
- If Poof! has no price for that marketplace and a complete read finds one, Poof! saves it.
- If a complete read finds a different price from Poof!'s, Poof! copies the new price in, as long as the read is newer than your own last change to that price.
Each change shows in the bell (for example "Vinted price changed $45 → $39") with Undo. A price you undo is not filled in again. Poof! never changes a price on a marketplace that is not recorded as posted, and never on a sold item.
Wording
A complete read can fill a Main listing that is still completely empty, once, with Undo. Any other difference in title or description waits in the review list for you.
Check shops
Check shops looks through your shop pages and saved listing links on Vinted, Facebook Marketplace and ThredUp, to find listings you posted outside Poof! and link them to your items. Open it from the side pane: Check shops.
Run a check
- Tick the marketplaces to check.
- Open My shop & listing links for each one and add your shop's link, any listing links (one full link per line), or a page you saved from that marketplace.
- Press Check shops. Stop checking stops it. Read only the pages and links I added reads only what you added this time.
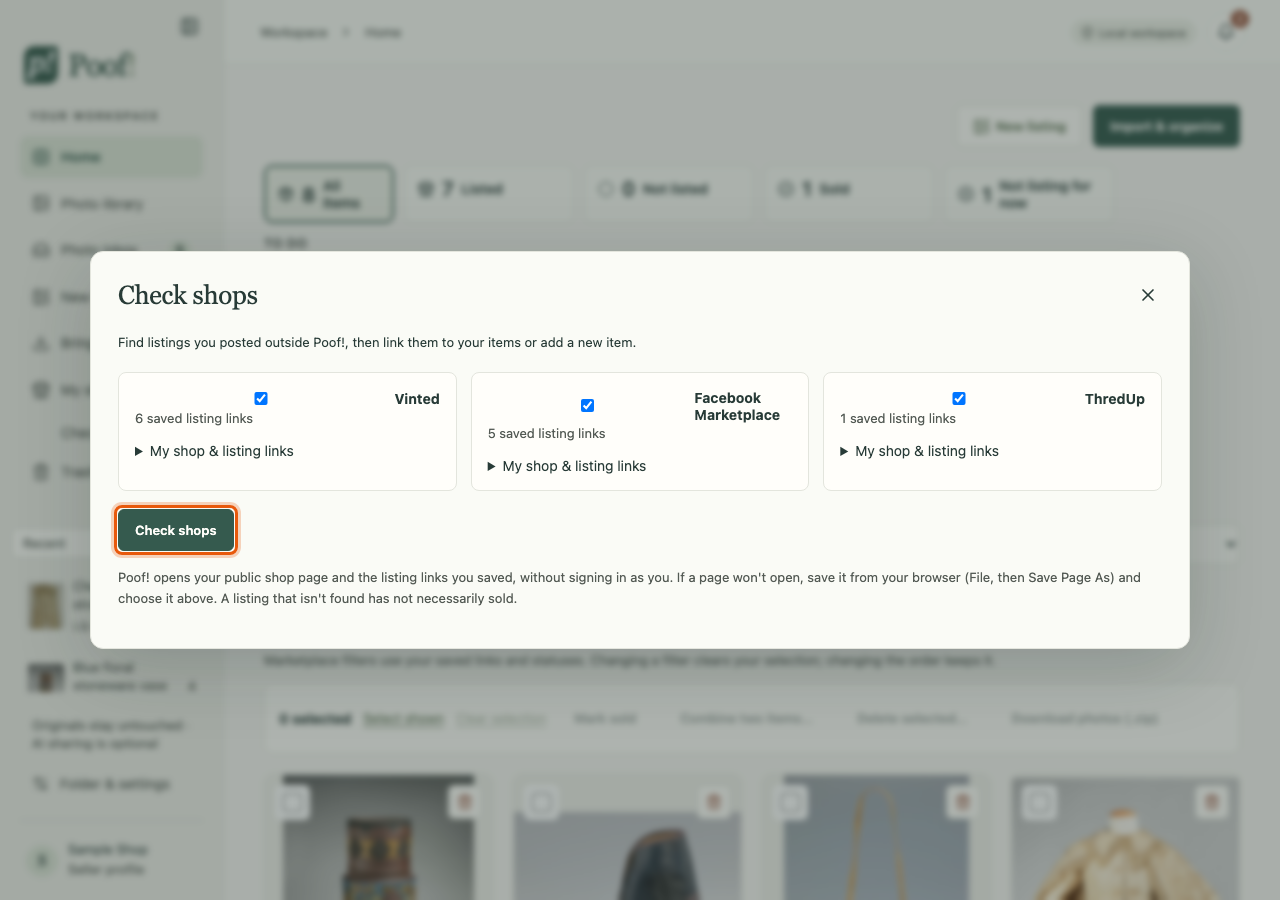
Poof! opens your public shop page and the links you saved, without signing in as you. If a page won't open, save it from your browser (File › Save Page As…) and choose it instead.
Read the results
- A listing whose exact number Poof! already knows is matched to its item.
- A listing that only looks similar by its wording is shown as a possible match. Make sure it is the same piece before choosing it.
- For a new listing, choose an item and press Link to this item, or press Add item & link listing to make a new item. Undo link reverses a link.
- A page that reports sold says so; open the item and confirm with Mark sold….
What was checked shows what Poof! could and couldn't open. A listing that isn't found has not necessarily sold, and nothing is removed or marked sold because of a check. Earlier checks are under Check history.
Selling
Mark sold, To ship and shipping labels
Mark an item sold
When something sells, record it in Poof! so it leaves your to-do lists and shows as sold.
- On the item page, press Mark sold….
- Choose where it sold under Sold on. Poof! suggests that marketplace's saved price; check it and tick I confirm the final sold price, or leave the price blank if you don't know it.
- Check the Sold date (today by default).
- Under Delivery, choose By mail or In person / pickup. With By mail, Shipping starts at To ship; you can add a Ship by date if the marketplace gave you one.
- Optionally add How the buyer paid, fees and what you paid for the item.
- Press Mark sold.
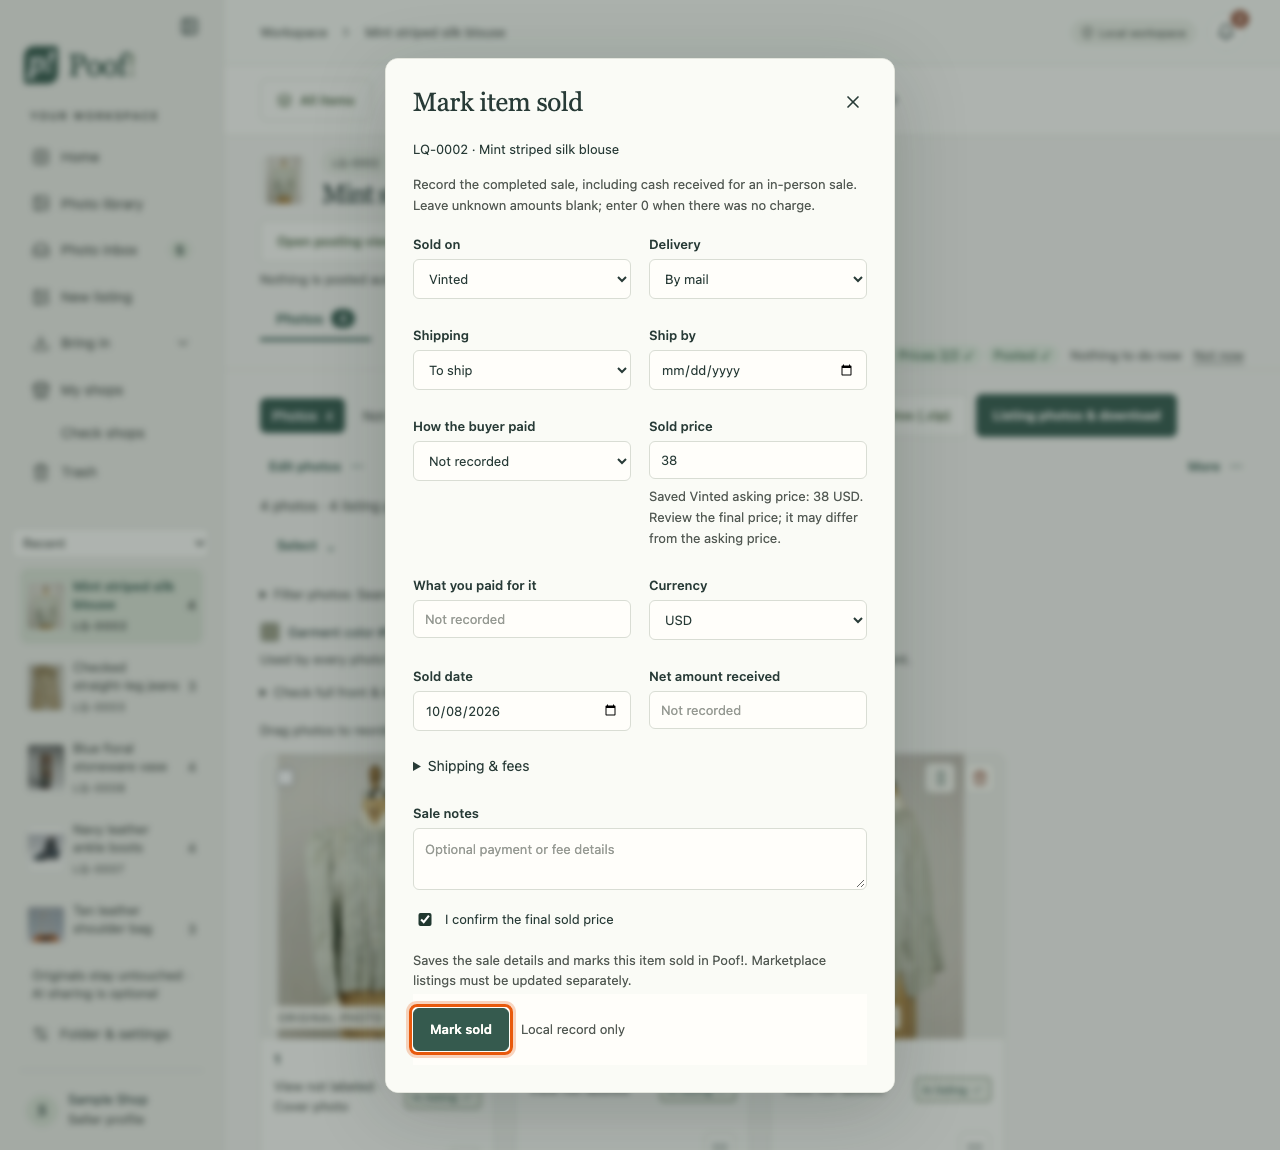
Poof! records the sale only on your computer. It does not take the listing down on any marketplace; do that yourself on each marketplace. On the sold item's page, Sold — check your other listings helps you see which other listings still need taking down. It reads their public pages and asks you to confirm each one; nothing is removed automatically.
A sold item's page leads with the sale. Sale details corrects the sale record later. Undo sale makes the item available again in Poof! and keeps the sale history.
Selling elsewhere
Poof! never marks an item sold by itself. Even when a listing reads as sold, Poof! only asks you; the sale is recorded when you confirm the sale form.
To ship
An item appears in To ship only when you record a sale with delivery By mail and Shipping set to To ship. To ship lives in the alerts bell at the top right. Each entry shows the item, where and when it sold, and your ship-by date.
When you have sent the parcel, press Mark as sent. Poof! records the date and the item leaves the list. Marking as sent changes nothing on any marketplace.
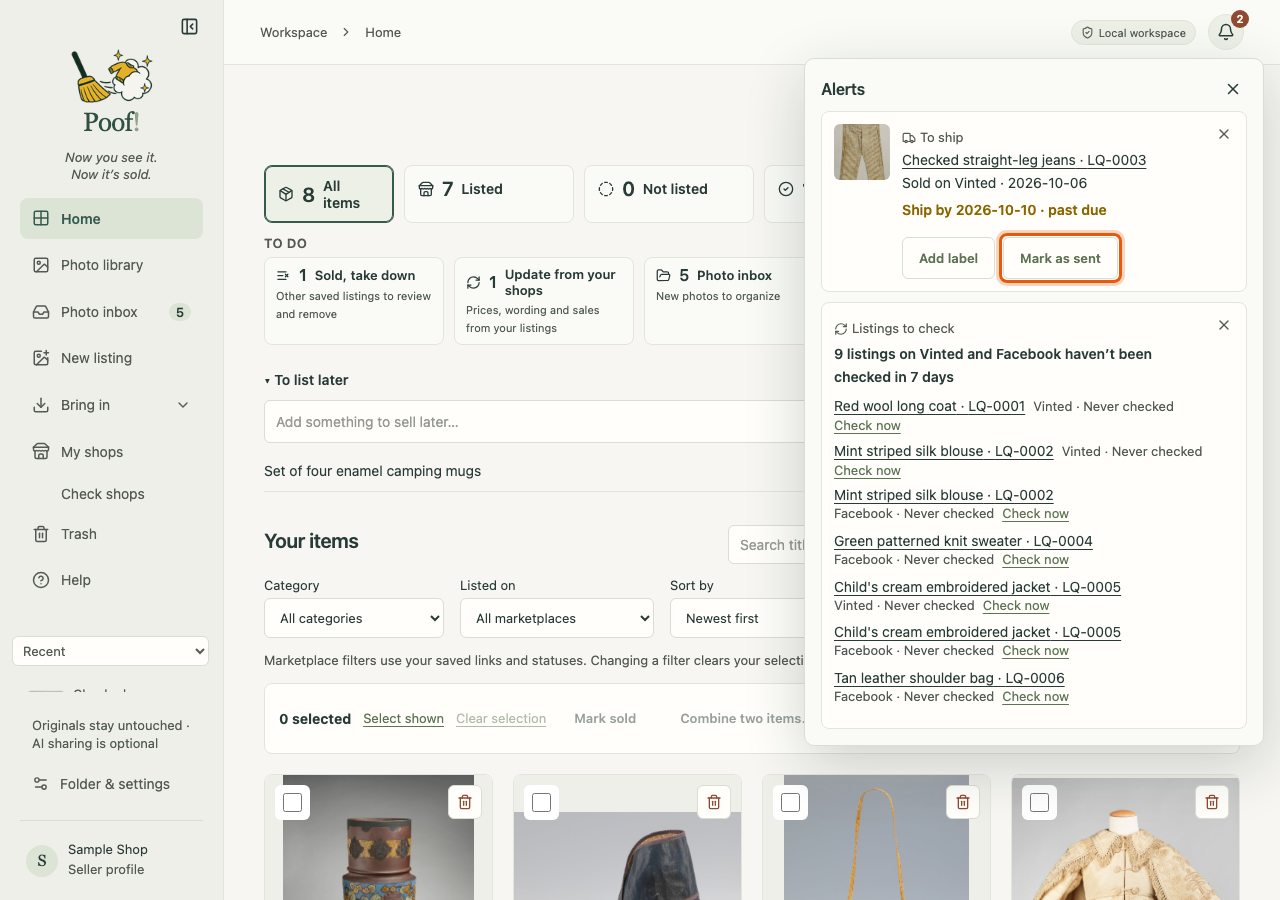
Shipping labels
Keep a sold item's shipping label in Poof! and print it on 4×6-inch label paper.
- On the sold item, press Shipping labels (or Add label in the bell's To ship entry).
- Choose the Label marketplace and press Add shipping label PDF. The file must be a PDF smaller than 10 MB.
- Press Resize to 4×6…, then choose the label area:
- Fit label · remove blank margins trims empty margins and fits the whole label;
- Fit whole page keeps the full page;
- Select label on page lets you drag a box around the label, including its barcode.
- Use Rotate label if needed, then press Create 4×6 copy.
- Check the preview, then press Open & print 4×6. In the print window, choose 4×6 paper, 100% / Actual size, and single-sided.
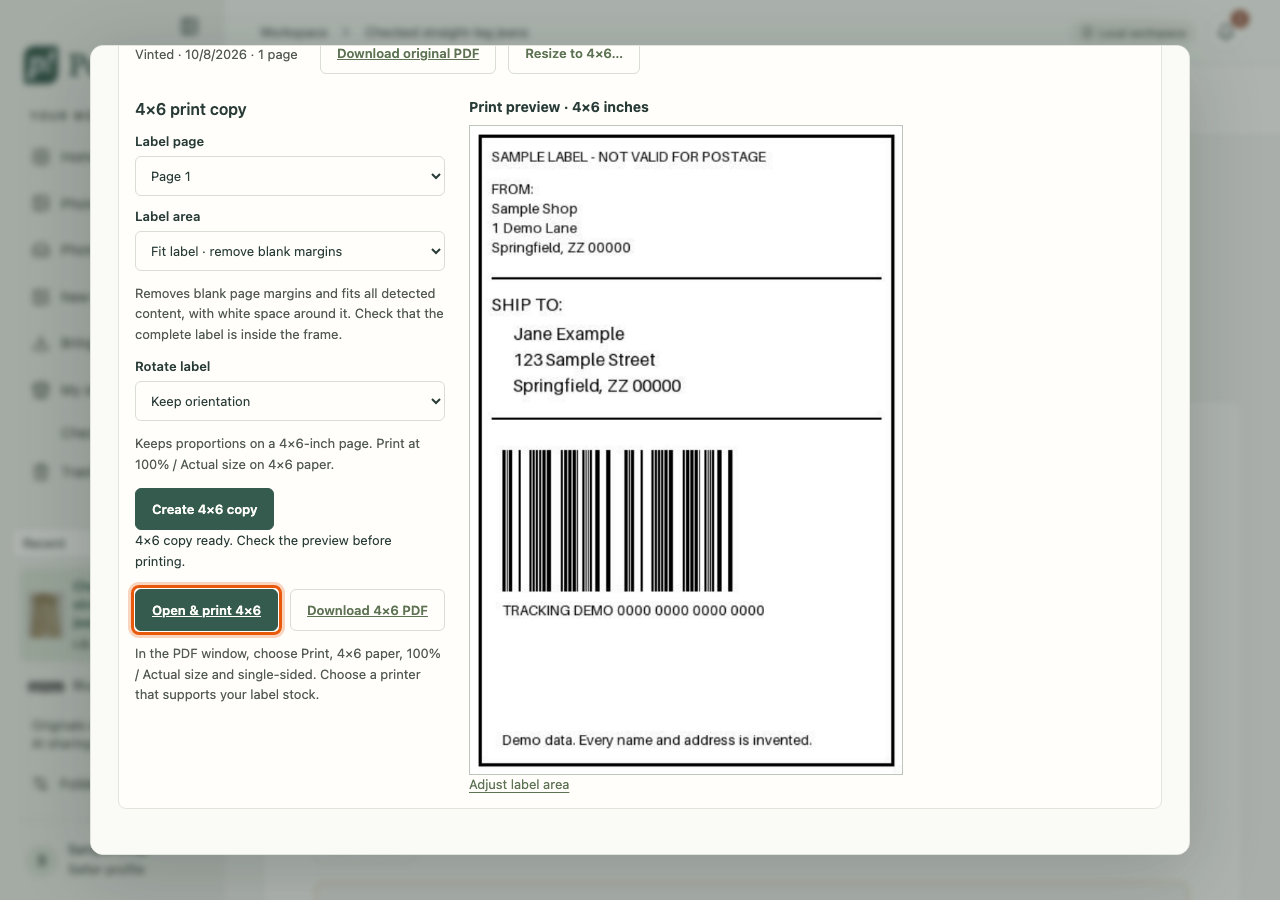
Download original PDF and Download 4×6 PDF save the files instead. Poof! keeps your original label unchanged and makes the 4×6 copy separately.
Labels stay on this computer. They contain addresses, so Poof! never sends them to AI and never puts them among your photos. Adding a label does not mark an item sold.
Photos
Download photos
Download your listing photos to upload them yourself, for example from your phone.
One item
On the item's Photos tab, press Download listing photos (.zip). You get one zip of the item's listing photos:
- in your photo order, cover first;
- as they look now, with your edits;
- up to 2,000 pixels on the long side, as JPEGs;
- named with the item's code and a short title, for example
LQ-0001_wool-coat_01.jpg.
Photos marked Not used are left out. Downloading changes nothing about the item or its photos.
Several items
- On Home, tick the items you want.
- Press Download photos (.zip) in the selection bar.
You get one zip with a folder for each item, holding exactly what that item's own download would hold. A line then says how many items are in the zip and lists any that were left out, with the reason (for example no listing photos). You can download up to 50 items at a time.
Upload copies for posting
When you post with the Post panel or the posting view, Get photos ready and Show photos in Finder (Show photos in File Explorer on Windows) give you the same copies in a folder instead of a zip.
Edit photos
Poof! has its own photo editor that works in your browser, on your computer. Your original photo files are never changed: every edit is saved as a new version inside Poof!.
Open an item's Photos tab, click a photo to open the large viewer, then press Edit photo.
The photo window fills your browser window. Close it with ✕ in its top-right corner (or Esc); clicking beside the photo does not close it. In the large viewer, ← and → move to the previous and next photo, and S stars the photo.
In the editor the photo takes the middle. The bar along the top has ← Back to photo, the photo's name and its place among the item's photos (such as "2 of 6"), the three sections, Undo, Redo and Star. The settings sit in a column on the right that scrolls on its own. The bar along the bottom has the zoom buttons, whether the photo is saved, with "Saves automatically after you pause.", and ← Previous photo and Next photo →. While you fix the cut-out, its tools run down the photo's left edge, and their options, with Done, stay at the top of the right column. On a narrow window the settings move below the photo.
Esc steps back one level at a time: first a shape or stroke you are drawing, then a selection you have not used, then Fix the cut-out, then the editor back to the photo (saving first), and last the photo window itself.
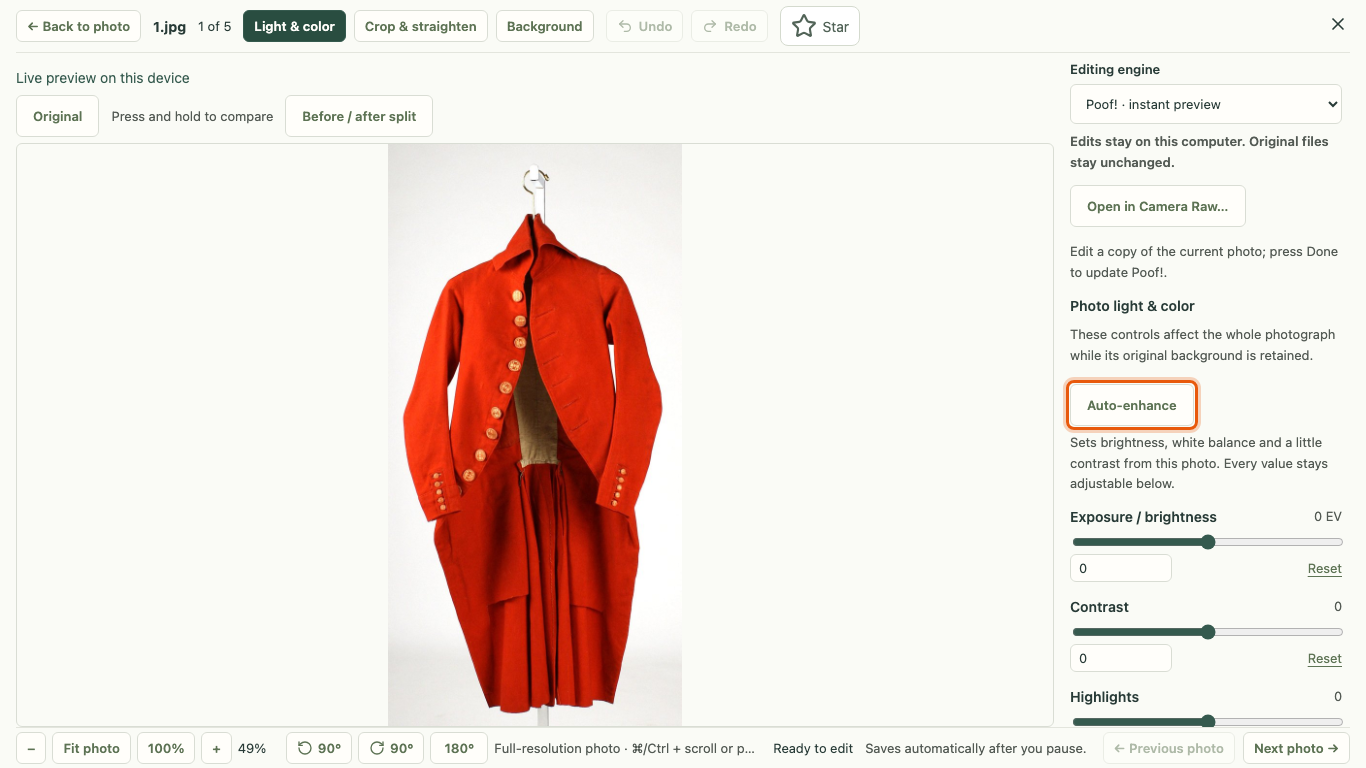
Zoom and move around
Scrolling over the photo moves around it when you have zoomed in; over a photo that fits, it scrolls the page or settings as usual. To zoom, hold ⌘ (on a Mac) or Ctrl (on Windows) while you scroll, or pinch on a trackpad. The zoom buttons in the bottom bar do the same, and double-clicking the photo switches between fitting it and 100%.
Keys
| Key | What it does |
|---|---|
| ⌘Z / Ctrl+Z, ⇧⌘Z / Ctrl+Shift+Z | Undo, Redo |
| + − 0 1 (after clicking the photo) | Zoom in, zoom out, fit, 100% |
| S | Star or unstar the photo |
| Esc | Step back one level (see above) |
While Fix the cut-out is open:
| Key | What it does |
|---|---|
| H | Hand: move the photo (or hold Space for a moment) |
| Z | Zoom: click to zoom in there; Option-click (Alt-click on Windows) zooms out |
| W | Object select; press again for Quick select |
| Shift+W | Magic wand |
| B | Brush |
| L | Lasso; press again for Magnetic lasso |
| X | Swap Keep and Remove |
| [ and ] | Smaller or larger brush (Brush, Quick select and Straight line) |
| ⌘ or Ctrl with = − 0 1 | Zoom in, zoom out, fit, 100% |
Pointing at a tool button shows its name and key. No key does anything while you are typing in a text box. Your browser may keep ⌘/Ctrl + 1 for switching tabs.
How saving works
- Your photo saves automatically a moment after you stop adjusting, and the editor says when it is saved. Save now saves at once.
- Undo and Redo (⌘Z and ⇧⌘Z) step through your changes.
- Press and hold Original to compare with the photo as it was when you opened the editor, or use Before / after split.
- ← Previous photo and Next photo → save this photo and move on, without closing.
The editor has three sections.
Light & color
- Auto-enhance sets brightness, white balance and a little contrast from the photo. Every value stays adjustable.
- Sliders: Exposure / brightness, Contrast, Highlights, Shadows, Whites, Blacks, Warmth, Tint and Vibrance, plus Sharpness and Noise reduction.
- Color reference helps you match the garment's color to a swatch you choose. It is a visual aid, not a color measurement.
When the background is edited separately, these sliders change only the item, and the background keeps its own look.
Crop & straighten
- Crop ratio starts at 3:4 portrait, a shape that suits most marketplaces' photo grids. Other shapes include 4:5 portrait, 1:1 square and Free crop. A ratio you saved for a photo always wins over the default.
- Drag the box to move it, drag its edges or corners to resize it, or use the arrow keys to nudge it (hold Shift for bigger steps). Then press Apply crop.
- Crop to item trims empty background around the item at the chosen shape, keeping all of the item.
- Fit whole photo keeps the full photo and adds background space instead of cropping.
- Rotate, Draw straighten line and Draw perspective guides fix tilted photos. Reset framing starts over.
- Under More crop options, Flip horizontal and Flip vertical mirror the photo, including any label text, so use them with care.
To crop or enhance many photos at once, use the Photos tab's Edit photos menu, for example Crop all listing photos to the item… or Auto-enhance all listing photos….
Background
To change the background, Poof! first separates the item from its background (the cut-out). Press Prepare background on this computer (or Prepare background in Photoshop). Your original photo stays unchanged.
Then choose a Background finish:
- Solid: a plain color, with Background brightness, Background softness and Background color.
- Soft studio light: a gentle studio-style backdrop.
- My room: your item in front of a photo of your own empty space. Add room photos in Folder & settings, under Backgrounds, with Add my room background…. Drag the item or use the arrow keys to place it, set its Size, and keep or turn off the plain Floor shadow. The room photo gets none of the item's light and color changes.
Add floor adds a simple floor plane with its own position, angle and color.
To give several photos the same background, select them on the Photos tab and press Match background of selected….
Photoshop or the free cut-out
Poof! can make the cut-out two ways:
- Photoshop, if it is installed on your Mac (Poof! uses Photoshop only on a Mac). Poof! notices it is installed and prefers it.
- On this computer, with a free cut-out tool you can add (see Add-ons).
When Photoshop is installed, the Background section shows Cut-out made with with a choice of Photoshop or On this computer. Poof! remembers your choice. A photo already cut out with the other one keeps its cut-out until you press Make the cut-out again on this computer (or …in Photoshop); your fixes carry over.
Fix the cut-out
Sometimes the cut-out leaves out part of the item, such as a mannequin's base or stand, or keeps a bit of background. Press Fix the cut-out:
- Parts left out of the cut-out show under a red tint. Removed parts sets how much they are hidden: all the way up hides them, and all the way down shows them with only a faint red tint. Poof! remembers this setting in your browser; it only changes what you see while fixing.
- Choose Keep to put parts back, or Remove to take leftover background out. Hold Shift to keep or Option (Alt on Windows) to remove for as long as you hold the key, as in Photoshop.
- Tools, each named after the Photoshop tool it works like: Object select, Quick select, Magic wand, Brush, Lasso and Magnetic lasso. Straight line and Box are in the More tools list (the ⋯ button).
- Press Hide red to see the finished photo without the tint, and press it again to bring the tint back. Holding Space shows the finished photo for a moment and lets you drag the photo.
- Undo cleanup and Reset cleanup undo your fixes. Done closes the tools; your fixes are kept.
Object select works like Photoshop's Object Selection: point at a part and it turns blue, then click to keep or remove it. You can also drag a rectangle around it, or choose Freehand and draw a loose loop around it; small gaps the selection leaves inside your loop, such as at a shine or along a handle, are filled, while larger openings like the middle of a ring stay open. Quick select works like Photoshop's Quick Selection: paint along the part and the selection grows to its edges; it is used when you let go. Paint again to add another part to it (each stroke adds), or paint with the other of Keep and Remove to take some back. Lasso changes exactly the area you draw around, without snapping to edges: drag to draw freehand, or click from point to point and click the start to finish. Magnetic lasso works like Photoshop's: click once on the edge of the part, then move along its outline without holding the button, and the line follows the edge. It stays near the path of your pointer, so a stronger edge off to the side does not pull it away. Click to pin it where it wanders; click the start or double-click to finish. When the selection tool is installed, the first time you choose the Magnetic lasso on a photo your computer also works out the item's outline with it, which takes a few seconds; meanwhile the lasso works as usual. The tool options then say Edges ready, and from your next shape the line follows the item's outline more closely. Each photo needs this only once.
Magic wand works like Photoshop's: click a color and it selects the pixels of a similar color next to it. With Remove it picks among the parts the cut-out keeps, for example a patch of leftover backdrop; with Keep it brings back removed parts of that color. Tolerance sets how close a color must be (start low and raise it if too little is picked). Contiguous, on at first, keeps the selection to pixels touching the spot you clicked; turn it off to take that color anywhere in the photo. Shift-click adds another spot to the selection. Check the striped highlight, then press Apply selection, or Cancel selection to drop it. The Magic wand needs no download.
Example: a white mannequin base on a white backdrop. Choose Keep and the Magic wand, click the base, and lower Tolerance until the highlight stops at the base's edge. Press Apply selection. If a sliver of backdrop came back with it, choose Remove and the Lasso and draw around the sliver.
Every click or stroke is used straight away. Undo cleanup or ⌘Z (Ctrl+Z on Windows) takes it back. Object select and Quick select run on your computer and need a one-time download first: press Download the selection tool when you choose one of them. Nothing is sent anywhere. They work on cut-outs made on your computer; for a Photoshop cut-out, choose On this computer in Background and make the cut-out again.
Saved keep areas
If you always shoot with the same set-up, for example a mannequin whose base the cut-out keeps removing, mark the base once and press Remember as a keep area…, give it a name and press Save keep area. Later, choose it from Saved keep areas to keep that part in other photos of the same set-up. Keep areas only change which part is kept; they never change the photo's pixels.
Clean edges
For a cut-out made on this computer, Clean edges tidies the item's outline so it uses the item's own colors, without a rim left over from the old background. It changes only the narrow edge of the cut-out, starting from your fixes, and never the rest of the photo. It is ticked when you prepare the background on this computer, and you can untick it. It works on photos edited with the newer light and color.
Shadow
With the Solid or Soft studio light finish, Shadow adds a shadow made from the item's outline: None, Contact or Soft, with Shadow strength. It darkens only the new background, never the item.
Your usual background
With the Solid or Soft studio light finish, Use this as my usual background saves this photo's finish, color and shadow for your shop, with Undo. Photos you have not edited yet start with it when you prepare their background, and Match background of selected… offers it as My usual background.
Back to the original
When a photo has an edited version, the large viewer offers Back to the original. It makes Poof! use the original photo again for this photo. Your edited version is not deleted. Straight afterwards the viewer says "Showing the original · Undo"; Undo brings back the edit that was showing. Later, a photo that shows its original while it has a saved edit offers Use my latest edit, which brings back the newest one. Both only change which version the photo shows: no photo file changes, and every edit stays in the photo's history.
Notes for the next edit
The large viewer and the editor both have a Notes for the next edit box. Use it for what the photo still needs, for yourself, a helper, or Poof!'s AI photo preparation when you start it. In the viewer press Save notes; in the editor the notes save with the photo. Nothing in the photo changes until someone edits it.
Stars
Each photo on the Photos tab has a star in its corner. Click it to star a photo you want to come back to, and click again to remove the star. In the large viewer, Starred only shows just the starred photos. A star is only a reminder for you: it does not change which photos are in the listing.
Open in Camera Raw
If Photoshop is installed on your Mac, the large viewer offers Open in Camera Raw beside Edit photo. Camera Raw opens on a copy of the photo; when you press Done in Camera Raw, Poof! adds the result as a new edited version.
For a phone photo or an edited JPEG, Poof! hands Camera Raw a temporary full-quality copy (a lossless TIFF file) rather than a JPEG, so no quality is lost on the way there and back. Poof! deletes these temporary copies when the round trip finishes, is cancelled, or fails. Your original photo is never sent or changed.
For camera RAW photos, Camera Raw works on a working copy of the RAW file, and your settings can be saved beside the original as a sidecar file, only when you choose to. See What Poof! never does to your photos.
Collages
A collage puts two to six of an item's photos into one image, for example a full view beside close-ups of the label and fabric.
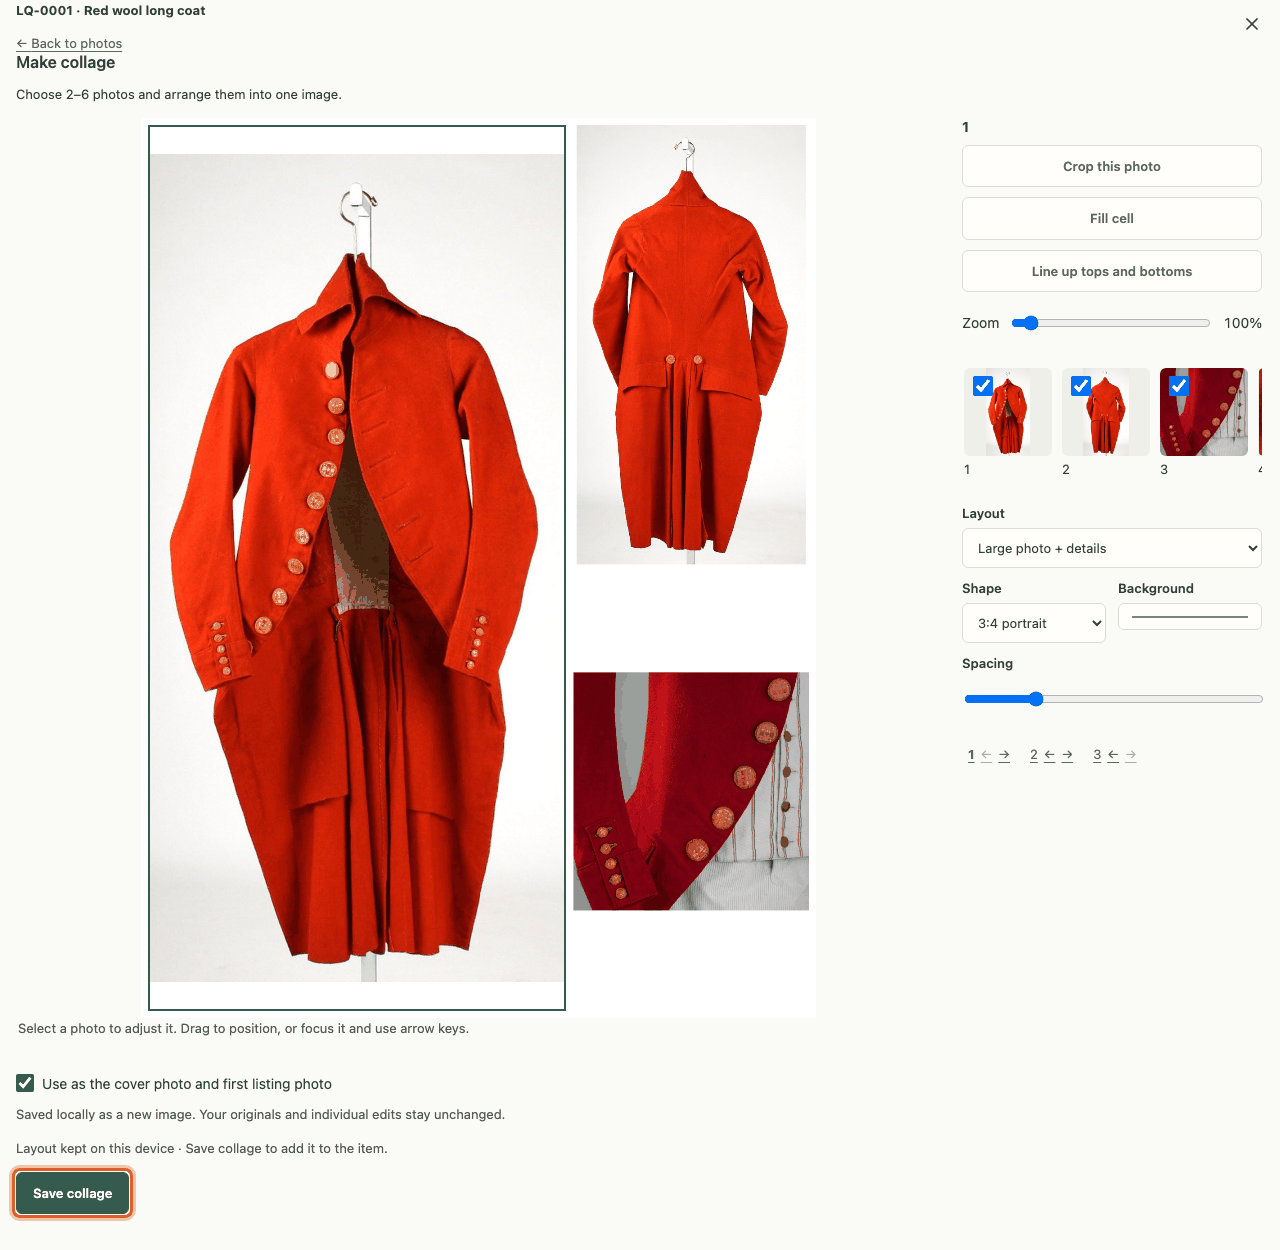
Make a collage
- On the item's Photos tab, press Make collage….
- Choose two to six photos (Include photo in collage).
- Pick a Layout (Grid, Large photo + details or Side by side) and a Shape (3:4 portrait, 4:5 portrait or Square). Set the Background and Spacing.
- Select a photo to adjust it: drag it to position it, use Zoom, or Fill cell. Line up tops and bottoms aligns the photos.
- Press Save collage.
The collage is saved as a new image on the item and goes into the listing. Your original photos and their edits stay unchanged.
Crop one photo in the collage
Select a photo in the collage and press Crop this photo. Draw, move or resize the box (arrow keys nudge it), then press Done cropping. The collage uses only that part of the photo. Reset crop undoes it for that photo. The photo itself is never changed.
Change a collage later
Click the saved collage to open it, then press Edit collage…. Your layout is kept.
Everyday
Home
Home is where you see all your items and what needs doing. Open it with Home in the side pane.
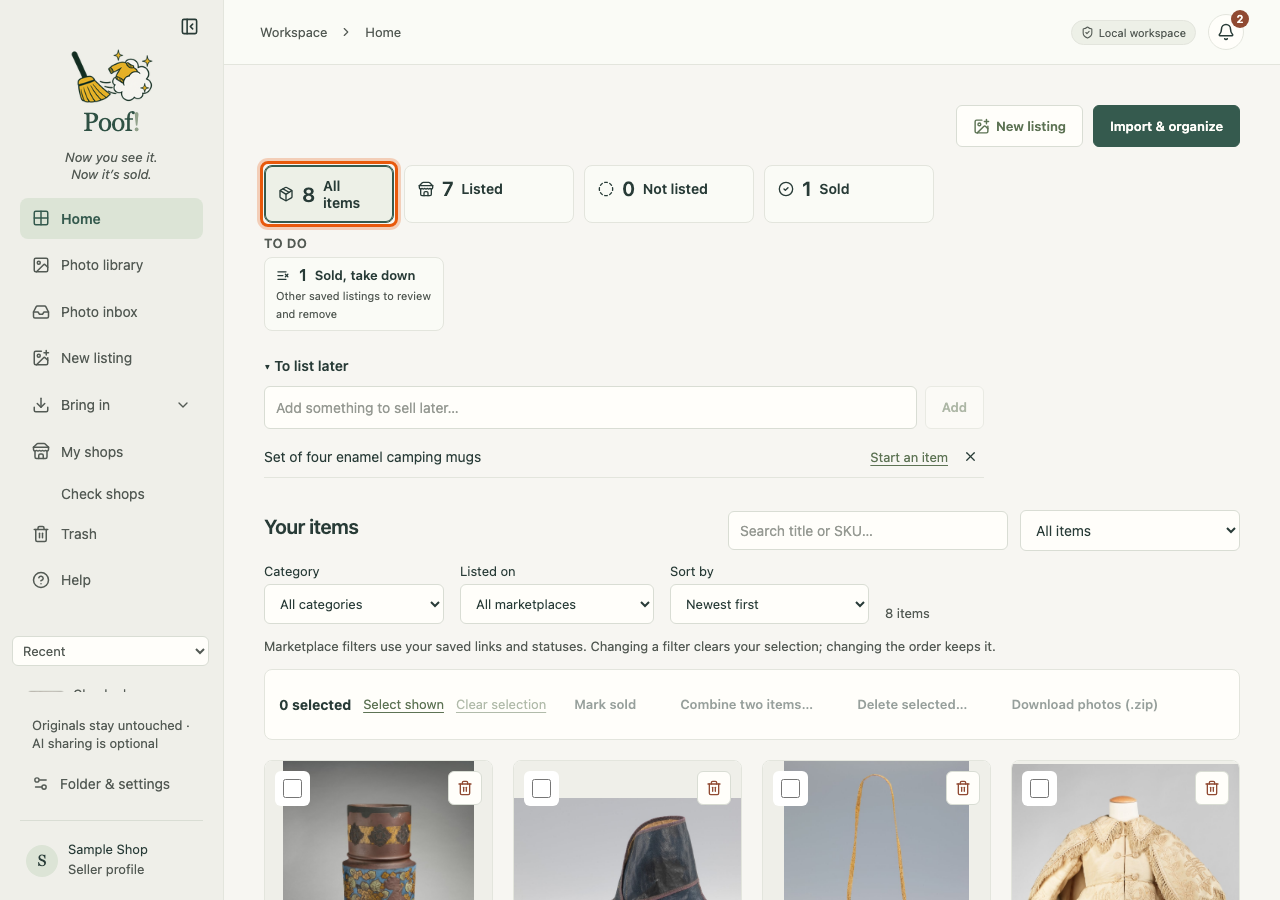
Status tiles
The tiles across the top count your items and filter the list below when you press one:
- All items: everything, sold items included.
- Listed: unsold items with a listing recorded on at least one marketplace. This is what you recorded in Poof!, not a live check.
- Not listed: unsold items with no listing recorded yet.
- Sold: items you marked sold.
Items you set aside have no tile: in Your items, choose More filters › Not listing for now. See Not listing for now.
To do
The To do row shows only what is waiting. Each card filters your items, and an item opened from a card lands on the tab with the work.
- Needs photos: no listing photos yet.
- Needs wording: the Main listing has no title or description.
- Needs a price: posted on a marketplace without a saved price.
- Ready to post: has listing photos and a Main title and description, but nothing is posted. Price and full front and back views are not checked.
- Sold, take down: sold items whose other listings you still need to take down.
- Update from your shops: changes and sales read from your listings. See Update from your shops.
- Photo inbox: new photos to organize. See Photo inbox.
- Photos to link: photos in item folders that are not linked to an item.
Your items
- The search box finds items by title or code.
- Category and Listed on narrow the list. More filters has more views, such as Unsold and Sold, no sale details. Clear filters shows everything again.
- Sort by orders the list: Newest first (the default), Oldest first, Recently changed, Name A–Z or Sold date (newest first). Sold date uses the date in an item's sale details, or else when you marked it sold; unsold items come after the sold ones.
Each item card shows its photo, code, title and one status line, such as "Listed · Vinted", "Not listed" or "Sold".
Home remembers how you left it. Open an item and go back, and Home shows the same filter, sort and search.
Work on several items at once
Tick items, or press Select shown to tick every item in the list. The selection bar then offers:
- Mark sold: marks the items sold in Poof! (add prices and labels on each item later);
- Download photos (.zip): one zip of their listing photos (see Download photos);
- Combine two items…: merge two items that are really one;
- Delete selected…: deletes the items from your inventory. Their photos and saved work are kept, and nothing changes on any marketplace.
View deleted items shows deleted items; tick them and press Restore selected to bring them back.
To list later
Home also has a To list later list for things you mean to sell but haven't photographed yet. See To list later.
Not listing for now and To list later
Not listing for now
Use Not listing for now for an unsold item you are not working on, for example something you decided to keep for a while.
- On the item page, press Not now beside the next step, or open More tools › Not listing for now.
- The item leaves Home's To do cards, and its next step is replaced by "Not listing for now".
- Nothing else changes. Its photos, details, listings and marketplace statuses stay. A listing that is posted stays posted and still shows as Listed.
- Find these items on Home: in Your items, choose More filters › Not listing for now.
- To carry on, press Bring back on the item, or More tools › Bring back to listing.
Sold items can't be set aside, and recording a sale brings an item back automatically.
To list later
To list later on Home is a short list of things you mean to sell, written as one-line notes, for example "blue wool coat in the hall cupboard".
- Type a note under Add something to sell later… and press Add.
- When you are ready, press Start an item. Poof! makes a new item titled with the note and marks the note done. Open item opens it.
- Delete a note you no longer need; Undo brings it back.
These notes stay on your computer. They are never sent to AI.
Profit estimates
On an item's Listings tab, each marketplace's price shows an estimate of what you would keep, for example "You'd keep about $36.00".
See your profit
Open Profit details below the marketplaces, press add what you paid on the You paid line and type the amount. The estimate then adds "profit about $…". What you paid stays private on your computer.
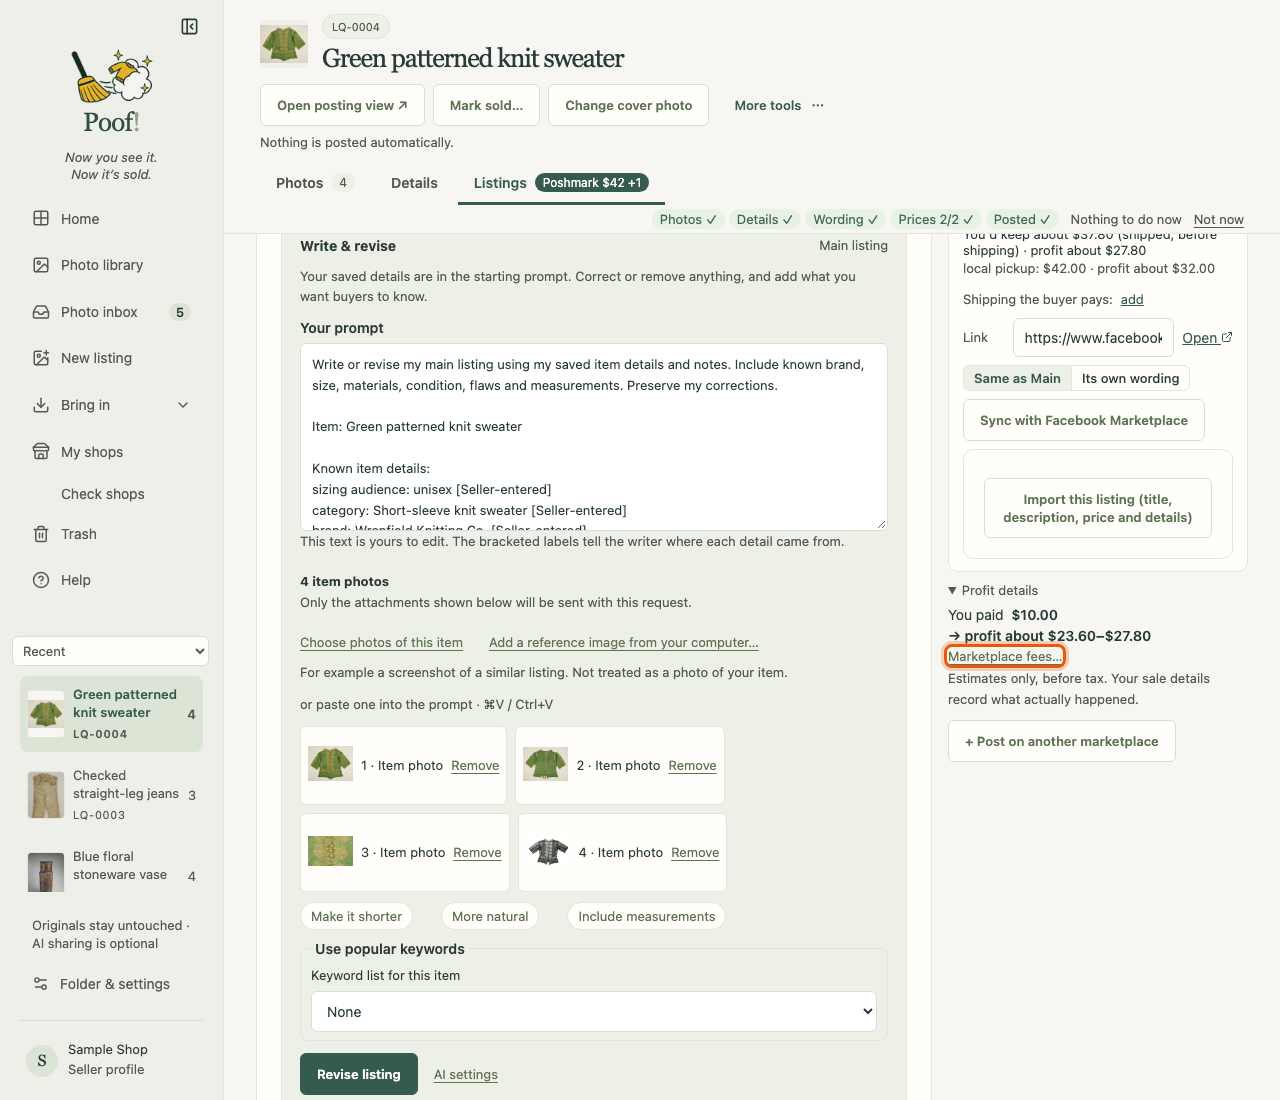
Fees
Estimates use a fee for each marketplace. Press Marketplace fees… to see and change them:
- Percent of the sale (%), Plus a fixed amount ($), Smallest fee ($) and a different fee for Sales under this price ($).
- Reset to the starting figures goes back to Poof!'s starting figures.
The starting figures come from third-party fee guides, not from the marketplaces, and are in US dollars. Fees change, so check them on each marketplace. A marketplace with no fee set shows no estimate until you enter one.
For marketplaces that charge a percentage on shipping too, you can add Shipping the buyer pays; left blank, the estimate is before shipping.
What estimates are not
Estimates are before tax and are only a guide. They never change your prices, your listings, or your sale records. When an item sells, Sale details records what actually happened.
Trash and Undo
Poof! can move photo files to your Mac's Trash when you ask. It never empties the Trash and never deletes anything for good, so you can always restore.
Moving files to the Trash works on a Mac for now. On Windows, Poof! cannot move photos to the Recycle Bin yet.
Delete one photo
Each photo on an item's Photos tab has a small trash button in its corner. One click moves that photo's files (the original, any edited copy and its companion files) to your Mac's Trash. A line appears, for example "Moved 3 files for IMG_0001 to Trash", with Undo. Undo puts every file back in one step and never overwrites a file that is already there.
If something about the photo's files has changed since Poof! last looked, the button shows you the files first instead of moving them straight away.
Delete several photos
Select photos and press Delete selected… in the selection bar, or use Move to Trash… in the Photo inbox or a photo's menu. Poof! lists every file first. Only the files ticked in that list move. Press Move … to confirm.
Restore from the Trash page
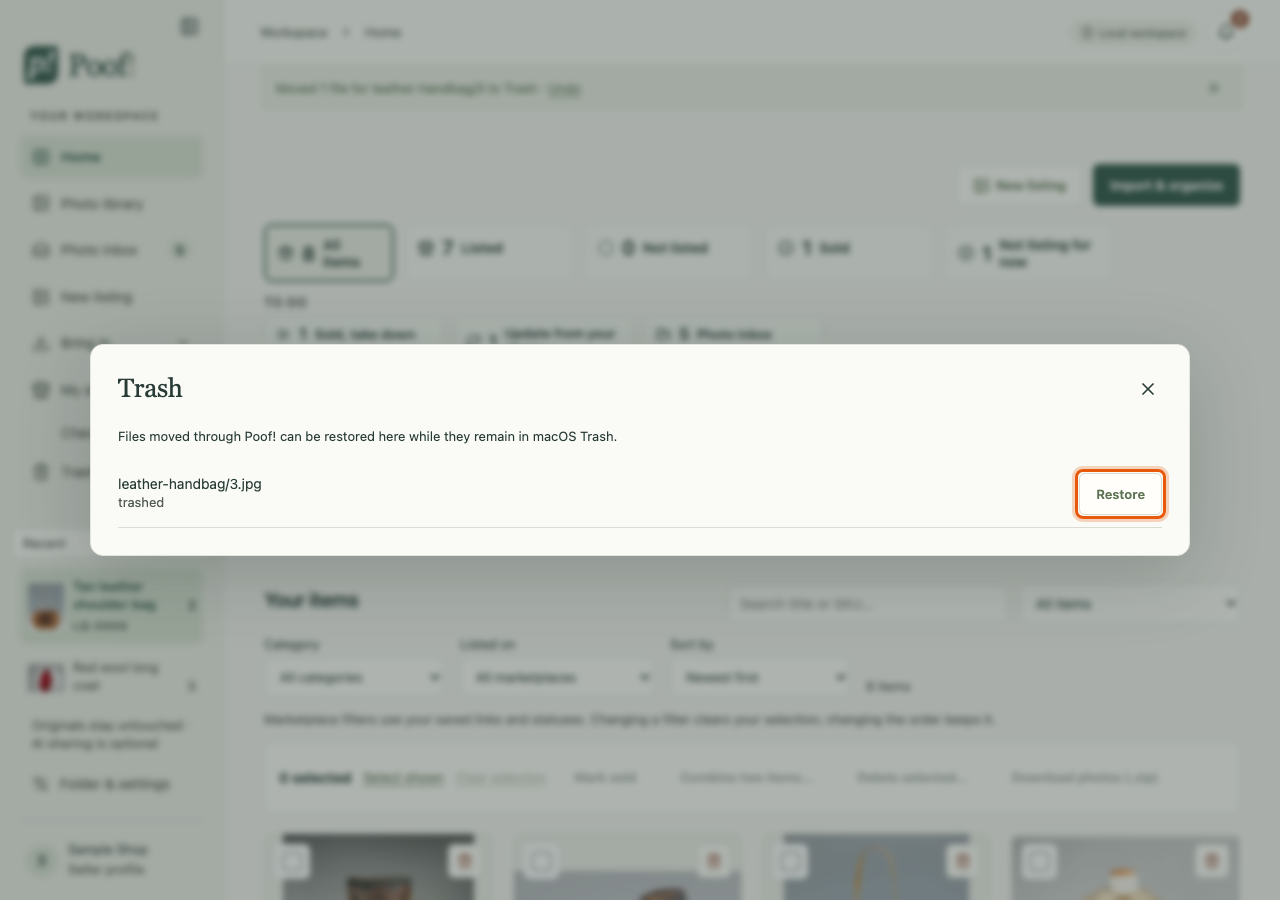
Trash in the side pane lists every file moved through Poof!. Press Restore to put a file back in its original folder, as long as it is still in your Mac's Trash.
Not the same as deleting
- Marking a photo Not used keeps it in Poof!; it is only left out of the listing.
- Deleting an item (Delete item…) hides the item but keeps its photos and saved work. It can be restored from Home's deleted items.
- Skipping or leaving a photo in the inbox never deletes it.
Once you empty your Mac's Trash yourself, files in it are gone for good. Poof! never does that.
Your computer
Settings and privacy
Poof! is a local app: it runs on your computer and keeps your work there. This page explains what is stored where, and what can ever leave your computer.
Folder & settings
Folder & settings in the side pane holds:
- your photo folder (the same window you saw at first-run setup);
- My shops: a link to your shop on each marketplace, and Match my listings;
- Popular keywords: your keyword lists (see Write a listing with AI);
- room backgrounds for the photo editor;
- the location of Poof!'s workspace folder, and Back up item database.
What is stored where
- Your photo folders stay exactly as they are. Poof! only reads them. See What Poof! never does to your photos.
- Poof!'s workspace folder holds everything Poof! makes: its database of items, details,
listings and decisions; photo previews; copies of photos you chose with Import & organize or
New listing; your edited photo versions and collages; item working folders; photos downloaded
from your marketplace listings; shipping labels; and backups. In the Mac app it is the
workspacefolder inside the Poof folder in your Library's Application Support (see Remove Poof! for how to find it). Folder & settings shows where it is. - The free cut-out and the selection tool, if you add them, keep their model files in the
workspace folder, under
models/. See Add-ons. - Your ChatGPT sign-in, if you use one, is kept by OpenAI's Codex app, never by Poof!.
Poof! is reachable only from your own computer, at the address 127.0.0.1. Other computers and
phones on your network cannot open it.
Local only by default
Out of the box, AI processing is set to Local only — no OpenAI. In that mode Poof! makes no AI requests of any kind. Saving, importing photos, your photo choices and editing photos never call an AI service, whatever the setting.
What a ChatGPT task sends, and when
If you choose ChatGPT — sends task inputs to OpenAI, Poof! remembers that choice for your shop. Even then, nothing is sent until you press a task's own button, such as Draft listing, Suggest item details or Find popular keywords.
- Each task shows what it will send before you press it. Many have Preview exact request.
- Photos are sent as previews of the photos you chose, never your original files or whole folders.
- Your private notes, your To list later notes, shipping labels, what you paid for items, and where files are stored on your computer are not sent.
- Switching back to Local only stops new requests and cancels running ones. It cannot take back what was already sent.
Poof! connects to ChatGPT through OpenAI's Codex app server, signed in with your ChatGPT account. OpenAI describes the Codex app server as experimental and not supported for production use. Your ChatGPT plan's usage limits apply. Poof! never uses a paid API key and never switches to paid API use.
Usage recording
Poof! can keep a local record of how it is used, to help find problems: which buttons were pressed, which screens were open, and which requests failed. It never records what you type, such as titles, descriptions, notes or prices.
Usage recording is off unless you turn it on in Folder & settings. Even when on, the record stays on your computer and is never sent anywhere.
Marketplaces and outside tools
Marketplaces have their own terms about tools that work alongside them, and those terms are broad and not fully clear. Poof! keeps its part small: it never posts, signs in or types for you, reads only what you ask it to read, and never pretends to be a web browser or anything other than itself. You are responsible for following each marketplace's rules.
Add-ons
Poof! works on its own. These optional extras add more. None of them is needed for the basic photo-to-listing workflow.
Folder & settings › Add-ons shows each one and whether it is on your computer. Nothing there is installed or downloaded until you press its button.
Photoshop
If Adobe Photoshop is installed on your Mac, Poof! notices it and offers the following (Poof! uses Photoshop only on a Mac for now):
- Open in Camera Raw in the photo viewer and editor;
- Photoshop as the way to make background cut-outs (see Edit photos).
Poof! detects Photoshop by its presence in your Applications; it does not start Photoshop to check. Poof! only ever sends Photoshop a copy of a photo, never your original.
ChatGPT
AI features (sorting photos, suggesting details, writing listings, finding keywords) use your ChatGPT account through OpenAI's Codex command-line tool.
- Install OpenAI's Codex command-line tool, following OpenAI's own instructions, so that the
codexcommand works in Terminal. - Sign in with your ChatGPT account. You can do this in Terminal, or press Sign in with ChatGPT in one of Poof!'s AI panels.
- In an AI panel, set AI processing to ChatGPT — sends task inputs to OpenAI.
Your sign-in is kept by Codex; Poof! never sees your password. Requests count against your ChatGPT plan's limits. The AI panels list the models your account offers under Model & effort. See Settings and privacy.
Free cut-out
A free tool that separates an item from its background on your own computer, without Photoshop. It never sends anything anywhere.
- Open Folder & settings and press Add-ons.
- Under Free cut-out, press Install (a download of about 102 MB on a Mac, about 112 MB on Windows). When it says it is installed, quit Poof! and open it again.
- Under Cut-out model, press Download. This one-time download is checked before use.
Prepare background on this computer now works. Until the free cut-out is installed, Cut-out model and Selection tool say "Install the free cut-out first".
The model is stored in Poof!'s workspace folder, under models/rembg. If an earlier version of
Poof! already downloaded it to a hidden .rembg folder in your home folder, Poof! copies it into
the workspace and leaves the original where it was.
The free cut-out needs an Apple-silicon Mac for now. On an Intel Mac, Add-ons shows it as not available.
If you run Poof! from its source code
Whenever you run the install commands again, add --extra background to the end of the
uv sync command. Without it, the free cut-out is removed. The Mac app and its updates keep
it by themselves.
Selection tool
Object select and Quick select in Fix the cut-out need their own one-time download.
Press Download the selection tool when you choose one of them, or Download under
Selection tool in Add-ons; the download is stored in Poof!'s workspace folder, under
models/, and runs on your computer.
The offer after setup
The first time you reach Home after setting up Poof!, one window asks Also get the selection tools for fixing cut-outs?. It lists each piece still missing on your computer (the free cut-out, the cut-out model and click to select) with its size and the total, and says they are downloaded once, kept in your Poof! folder and run on this computer only.
- Get the selection tools starts ticked. Untick it if you do not want them now.
- Nothing is downloaded until you press Continue. Continue with the box unticked downloads nothing.
- With the box ticked, the pieces download one after another behind one progress line.
- If the free cut-out was just installed, the line asks you to quit Poof! and open it again. When you do, Poof! carries on with the rest by itself, without asking again.
- If a download fails, one line says so and Poof! carries on as usual; you can still use the Download buttons in Fix the cut-out and here in Add-ons.
The window appears only once, and only on computers where the selection tools can run.
darktable
darktable is a free photo editor for camera RAW files. If it is installed in your Applications folder, the photo editor's Editing engine choice can offer darktable for RAW photos. Otherwise it shows as not installed.
Chrome side panel helper
A small Chrome add-on that shows Poof!'s posting view in Chrome's side panel, beside a marketplace page. It never types, clicks or reads anything on the page. See Post on a marketplace for the setup steps.
Back up and restore
Poof! keeps your work in its workspace folder (see Settings and privacy). Your original photos are separate: back them up the way you always do. Poof!'s backups never include your original photo files.
Quick backup of your item records
Open Folder & settings and press Back up item database. Poof! saves a copy of its
database in the workspace's backups folder and tells you the file's location.
This copy holds your items, details, listings, photo choices, sales and history. It does not hold image files, such as:
- your edited photo versions and collages;
- copies of photos you chose with Import & organize or New listing;
- item working folders;
- photos downloaded from your marketplace listings;
- AI-made images and shipping labels.
Poof! also saves a database backup by itself before it upgrades its database to a new version.
Full backup
To keep everything, including edited photos:
- Quit Poof! (the ✨ icon in the menu bar, then Quit Poof!).
- Copy the whole workspace folder to your backup drive.
- Start Poof! again.
Copy it while Poof! is stopped, so the copy is consistent.
Restore
- Quit Poof!.
- Keep your current workspace folder as it is, as a safety copy. Don't overwrite it.
- Make a new, empty folder for the restored workspace, outside your photo folders.
- Either copy a full backup of the workspace into it, or copy a database backup file into it
and rename that file
poof.sqlite3. -
Start Poof! with that folder as its workspace, by setting
POOF_WORKSPACEbefore the start command:POOF_WORKSPACE="/path/to/restored-workspace" backend/.venv/bin/python -m uvicorn app.main:app --app-dir backend --host 127.0.0.1 --port 8000 -
Check your photo folder is still connected, and scan it again so Poof! remakes its previews.
If you restored only the database, edited photos and other image files from the old workspace are not there; copy those folders across too if you still have them.
Remove Poof!
Removing Poof! never touches the photos in your own photo folders.
Remove the app
- Quit Poof!: click the ✨ icon in the menu bar and choose Quit Poof!.
- Open your Applications folder and drag Poof! to the Trash.
That removes the app. Your items, listings and settings stay on your Mac, so if you download Poof! again later, it picks up where you left off.
Remove your Poof! data too
Everything else Poof! keeps is in one folder, called Poof. Deleting it deletes your items, listings, edited photos, collages, shipping labels and the copies of photos you brought in with Import & organize or New listing. Your original files elsewhere stay.
- If you want to keep anything, make a full backup first, or copy out the edited photos you still need.
- Quit Poof!.
- In Finder, hold down the Option key and open the Go menu at the top of the screen. Library appears in the menu while Option is held; choose it.
- Open Application Support, then drag the Poof folder to the Trash.
Nothing else is left behind: Poof! keeps its tools, downloads, add-ons and logs inside that folder.
Also remove the extras you added, if any:
- the Chrome side panel helper: open
chrome://extensionsin Chrome and press Remove on "Poof! posting helper"; - OpenAI's Codex tool, if you installed it only for Poof!, following OpenAI's instructions.
What stays
- Your original photos in your photo folders. Poof! only read them.
- Files Poof! moved into item folders when you used Organize item folders. They are in your photo folder, where you put them.
- Files you moved to your Mac's Trash through Poof! stay in the Trash until you empty it.
- Listings on marketplaces. Poof! never changed them.
What Poof! never does to your photos
Your photos are the most important thing you own in Poof!. These are the rules it follows.
It never changes or deletes your original photos
- Scanning a folder only reads the files and makes previews in Poof!'s own workspace.
- Edits, crops, backgrounds and collages are saved as new versions in Poof!'s workspace. The original file stays exactly as it was: same picture, same name, same date.
- Rejecting, skipping or marking a photo Not used is a choice saved in Poof!, never a deletion.
- Photos you choose with Choose photos… or New listing are copied into Poof!. The files on your Mac are left where they were.
It moves files only through the reviewed Organize step
Poof! moves photo files in exactly one case: you connected a sorting folder named 00_SORT or
00_to_sort, sorted its photos into items, and pressed Finish sorting or Move files into
item folders (see Organize item folders). Then:
- you see the plan first;
- each file is checked before and after it moves;
- a file that is already there is never replaced, and duplicates are never deleted;
- photos you didn't sort stay where they were.
Scanning never moves anything.
It uses the Trash only when you ask
Files go to the Mac's Trash only when you press a trash button or confirm Move to Trash…. Poof! never empties the Trash, and Undo or the Trash page restores files. See Trash and Undo.
It writes a sidecar only when you save one
For camera RAW photos, Camera Raw settings can be saved as a sidecar file (an .xmp file) beside
the original. Poof! writes one only when you press Save RAW settings beside original in the
photo editor. If a sidecar with different settings is already there, Poof! does not overwrite it.
The RAW file itself is never changed.
Help
FAQ
Photos
Why are photos dragged from the Photos app so small?
When you drag photos out of the Mac's Photos app into the browser, Photos hands over small previews (for example 360 × 480 pixels), not your full photos. Poof! warns you when a photo looks this small. Instead, press Browse computer… (or Choose photos…) and pick Photos in the window's sidebar, or export the photos from Photos first with File › Export.
My iPhone photos have a hidden HDR layer. Is that a problem?
No. iPhone JPEGs often carry an extra hidden brightness layer for HDR screens. Poof! handles these photos automatically.
Why does my HEIC photo say "Preview appears after adding"?
Poof! makes previews of HEIC photos (the iPhone's usual format) once they are added, using the
Mac's own tools. Until then the tile shows that note. HEIC previews need macOS 14 or later and
Apple's command-line tools (run xcode-select --install in Terminal if you don't have them).
Where did my imported photos go?
Photos you brought in with Import & organize but didn't put into an item wait in the Photo inbox under New imports. The side pane's Photo inbox shows how many are waiting. Photos you put into an item are on that item's Photos tab.
How do I carry on with a review I saved?
Open the Photo inbox. Saved reviews wait at the top under Saved photo reviews; press Resume review.
Should I use Photoshop or the free cut-out?
Either works. Photoshop is used when it is installed on your Mac; the free cut-out runs on your computer without it (see Add-ons). When both are there, choose one under Cut-out made with in the photo editor's Background section; Poof! remembers your choice. Both can leave out part of the item, such as a mannequin's base or stand. Fix it with Fix the cut-out › Keep, and if it happens with every photo of the same set-up, save the base as a keep area so you mark it only once (see Saved keep areas).
Why does Camera Raw use a temporary copy?
For a phone photo or an edited JPEG, Poof! gives Camera Raw a full-quality copy (a lossless TIFF) so that no quality is lost on the way there and back, and your original is never touched. Poof! deletes these temporary copies when the round trip finishes, is cancelled, or fails.
Listings
Why does a marketplace show my Main listing?
Every marketplace uses your Main listing until you give it its own wording. That way you write once and every marketplace stays up to date. Press Use different wording for … when one marketplace needs different words. See Main listing.
Why does my description include my shop's standard text?
That is your shop's General template, text you saved once in the listing writer for all your items. Poof! adds it to new listings that are still empty. It never changes wording you already saved; to add it to an older listing, press Add general template to this listing.
How do I import a listing without making a duplicate item?
In the import window, look at Which item is this? before you press Save. Choose the item you already have, rather than New item. The line above Save says whether a new item will be made. See Import a marketplace listing.
I made a duplicate by mistake. What now?
Delete the extra item with More tools › Delete item…. Deleting an item frees its listing, so you can import the listing again onto the right item.
Vinted won't let Poof! read my listing.
Vinted often refuses automated reads. Poof! doesn't try to get around that. Instead, copy the listing's text and paste it into Paste your listing here, or save the listing page from your browser and choose that file. See Import a marketplace listing.
Why can't Poof! read my "my listings" page?
Pages you see only when signed in, such as a marketplace's page of your own listings, can't be read: Poof! never uses your sign-in. Use your public shop (closet) link instead, the one other buyers see.
Which listings can Check now read?
Vinted and Facebook Marketplace listings, one at a time. ThredUp and Poshmark listings can't be checked this way; import them again instead. See Update from your shops.
Everyday
What does "Not listing for now" mean?
It sets an unsold item aside so it leaves your to-do lists. Nothing else changes, and you can bring it back at any time. See Not listing for now.
What does the "unsaved changes" warning mean?
Poof! warns before you leave something unsaved, and names it, for example "Discard your unsent message to the AI writer and leave?". A message typed in the listing writer but not sent counts as unsaved, even when the title and description are saved. Go back and send or clear it, or leave if you don't need it.
Troubleshooting
"Poof!" Not Opened, or "Poof! can't be opened"
This is macOS's one-time check on apps that aren't signed with a paid Apple developer account. Press Done (or OK), then follow The first time: Apple's warning for your macOS version: on macOS 15 and 26 you press Open Anyway in System Settings → Privacy & Security; on macOS 14 you right-click Poof! in Applications and choose Open.
"Move Poof! to Applications first"
You opened Poof! straight from the downloaded disk, or macOS hasn't let it out of Downloads yet.
Press OK. Open the downloaded Poof-<version>.dmg again, drag Poof! onto
Applications, eject the Poof! disk (⏏ in the Finder sidebar) and open Poof! from your
Applications folder.
"Open Anyway" is missing
The Open Anyway line in System Settings → Privacy & Security appears only after you have tried to open Poof! once, and stays for about an hour. Open Poof! from Applications again, press Done, then go back to Privacy & Security and scroll down to the Security section.
"Poof! couldn't start"
The setup window shows this, or Poof! could not be set up, with the last lines of what happened.
- Setup stopped part way: check that your Mac is online (the first open downloads about 130 MB), then press Try again. Nothing is left half-installed.
- Other programs are using its connections: quit apps you started recently, then press Try again.
- Show log opens the full record. If it keeps failing, keep that file: it says what went wrong.
"Poof! is not responding"
Poof! itself isn't running. Your unsaved changes are still in the page. Open Poof! from your Applications folder again, then try again. If the ✨ icon is in the menu bar, choose Open Poof! from it.
The page won't open at all
Make sure Poof! is running: the ✨ icon is in the menu bar. Choose Open Poof! from it rather than typing an address, because Poof! may be using a different connection (see If another program uses Poof!'s connection). Only one copy of Poof! can run at a time.
A marketplace "didn't let Poof! read this listing"
The marketplace refused the read. Nothing was changed in Poof!. Try again later, or paste the listing's text into the import window instead. A listing that can't be read is never taken as sold.
A button is greyed out
Most greyed-out buttons say why beside them. Common reasons:
- an AI button while AI processing is Local only — no OpenAI;
- a photo action while nothing is selected;
- a save while another save is still finishing.
My photos look small or blurry
They were probably dragged out of the Photos app, which hands over small previews. See the FAQ.
The cut-out removed part of my item
Use Fix the cut-out › Keep to paint the missing part back. See Edit photos.
"Prepare background on this computer" is not available
The free cut-out isn't installed, or its model isn't downloaded yet. Open Folder & settings, press Add-ons, press Install under Free cut-out, then quit Poof! and open it again. Then press Download under Cut-out model. See Add-ons.
Poof!'s own message may name a command instead. You don't need it; the buttons do the same. If
you do run it in Terminal, run it from inside Poof!'s backend folder.
The free cut-out needs an Apple-silicon Mac for now.
AI says it isn't connected
Check that OpenAI's Codex tool is installed and signed in with ChatGPT (see Add-ons), and that AI processing is set to ChatGPT.